Your First Darty Document
This quick-start guide will help you create your first variable document right away.
Let's begin!
If you have not yet installed Darty-Ai, please see the Requirements before getting started with your first document.
Goal
Color and transform a shape and break the ice!
Template Setup
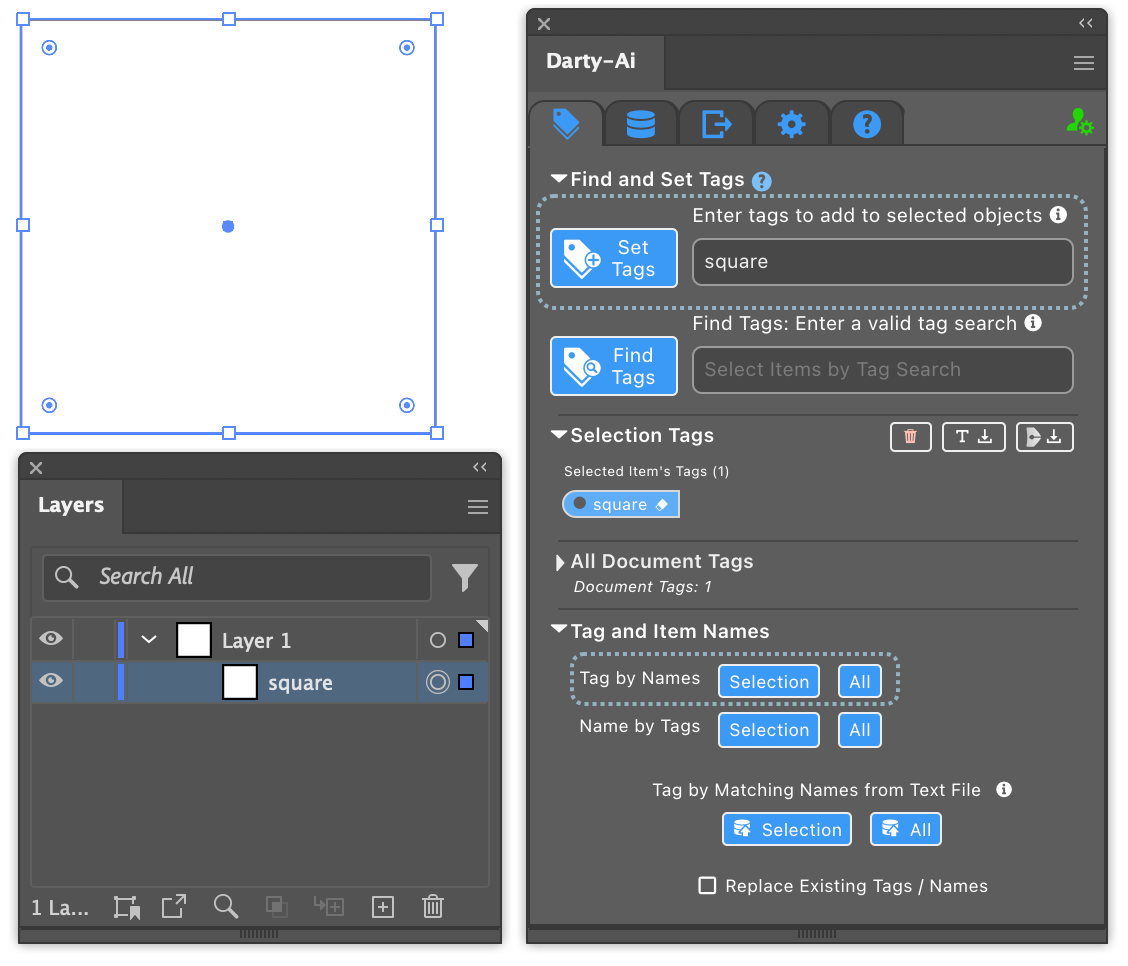
Draw a shape in an Illustrator document.
Tag the shape
To tag the shape, open the Tag tab in the Darty-Ai extension, click on the shape and enter a tag and either press enter or click the "Set Tags" button.
If you want you can use Illustrator's layer's panel to name objects and then in Darty-Ai's Tag tab click on the buttons next to "Tag by Names".
See the Tags tab for details.
Save the Changes
Save the document so that it has no more pending changes and the file's asterisk (*) disappears.
Create Data Sheet
To create a data sheet for Darty variable data you can use any popular spreadsheet program such as Microsoft Excel, OpenOffice, or Google Sheets.
Darty-Ai can currently import .xlsx and .csv files, so save your spreadsheet as either a .xlsx and .csv file.
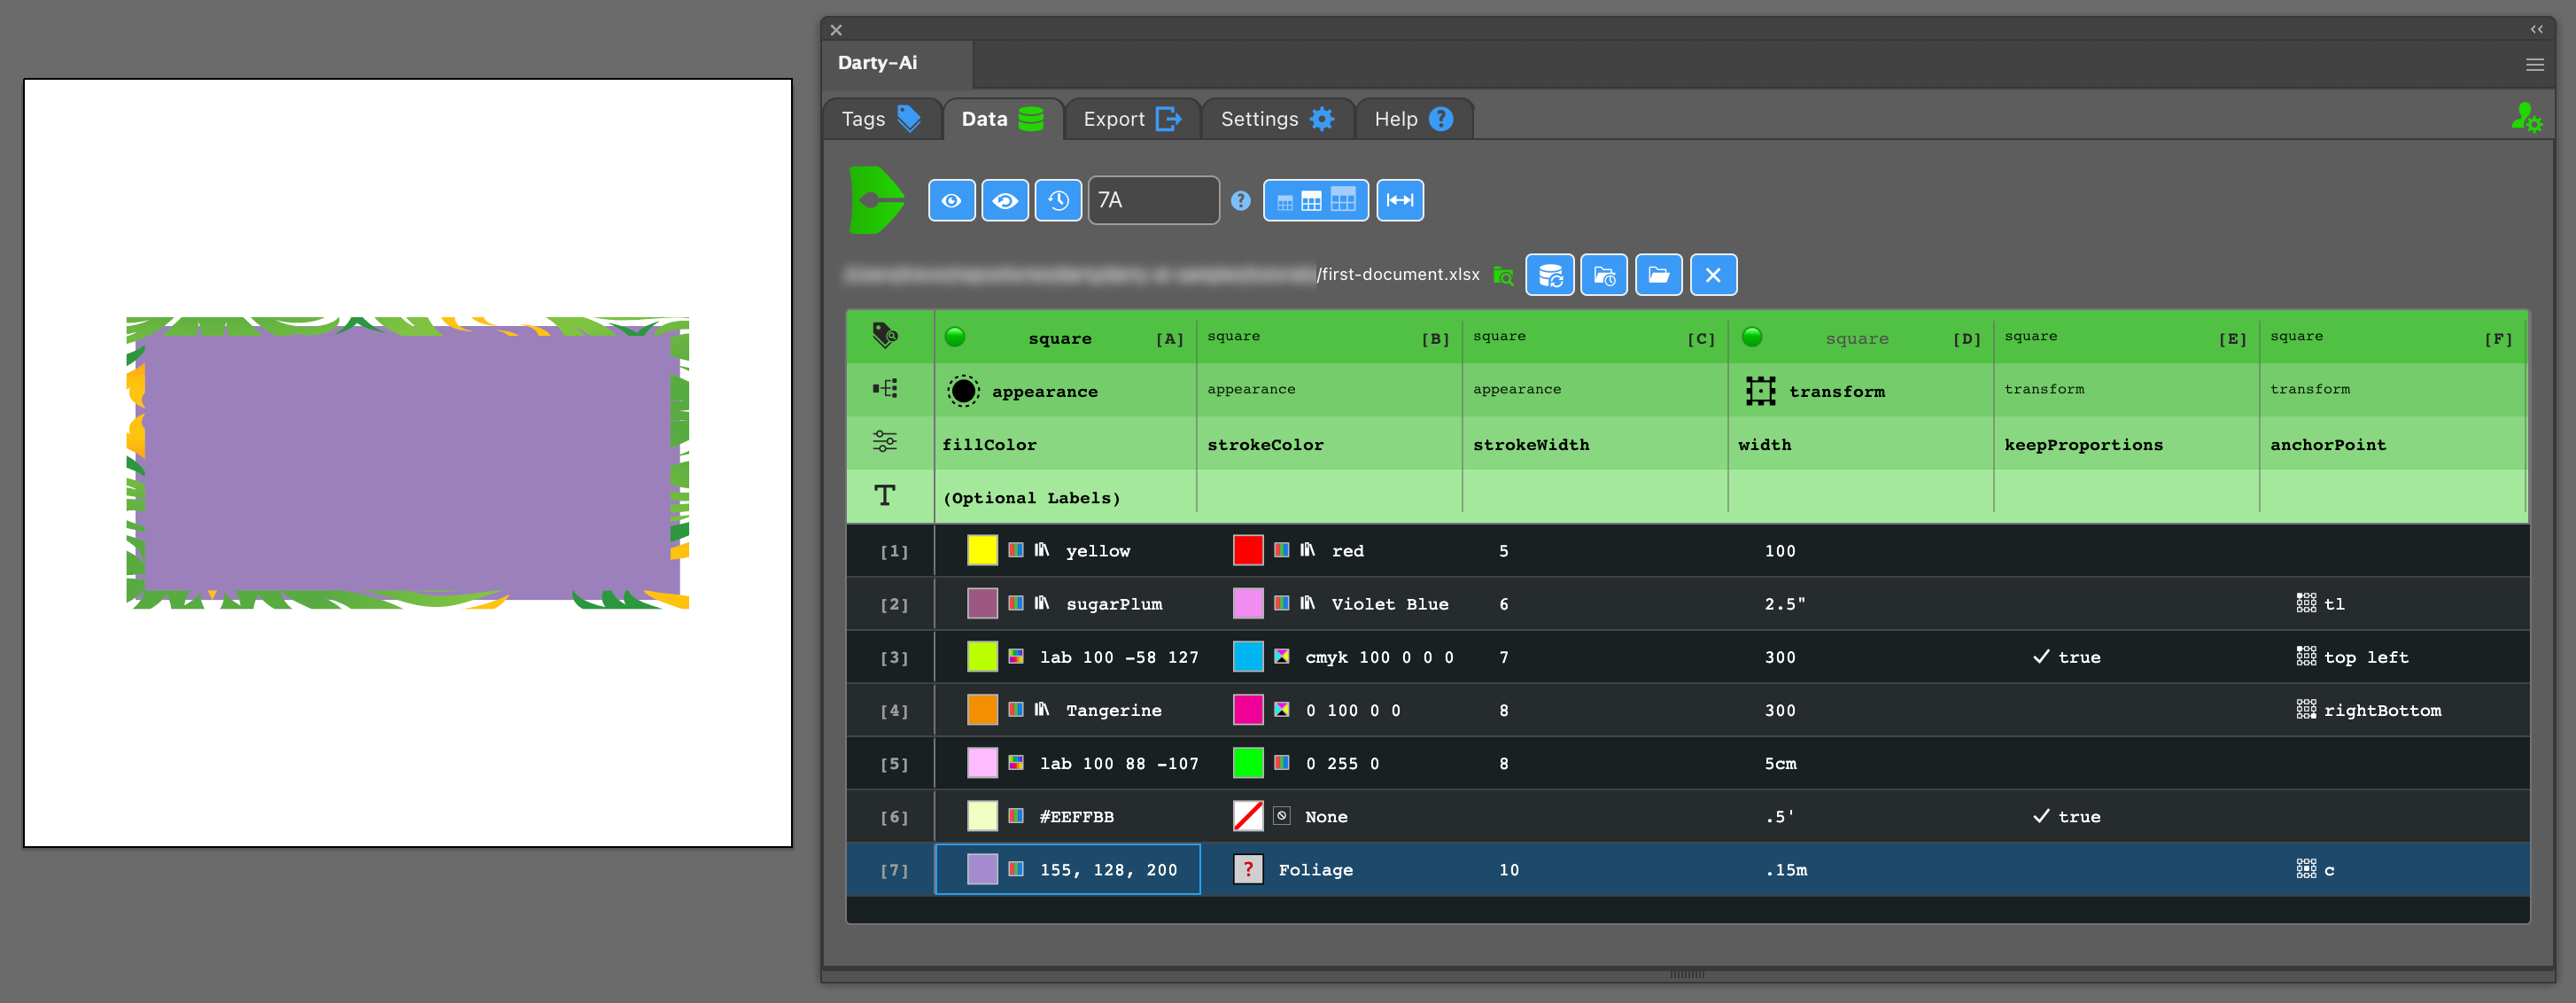
Header
The manual method of creating the Darty Header is to focus on the top 3 rows and fill them with the following:
tag- put the tag name assigned to the shape into the top row.method- in the 2nd row, write the wordappearancewhich will specify the Darty method that will be used on the art object in Illustrator.parameter- in the 3rd row, writefillColorto specify the fill-color parameter of theappearanceDarty method.Optionally set a default value by writing a colon and then a default value like this:
fillColor: black, then any rows that don't specify a color will color the shape black.
The 4th row is a 'key row', you can leave its contents blank, but it must be present.
You can download or copy and paste the contents of the below table into your spreadsheet, but make sure you at least change some of the values to break the ice 🧊.
Lookup the transform properties in transform documentation and add some of them to the header and data.
Data Body
The 5th row is where your data begins. In the column type in some values such as 50 and 100 -- obvious values which can be easily seen once the Preview mode is on.
Create as many rows as you like.
Once you are finished, save the spreadsheet file. If you are using Excel, you can keep it as the .xlsx format - otherwise please save it as a .csv file with comma delimiter.
| square | |||||
| appearance | transform | ||||
| fillColor | strokeColor | strokeWidth | width | keepProportions | anchorPoint |
| (Optional Labels) | |||||
| yellow | red | 5 | 100 | ||
| sugarPlum | "Violet Blue" | 6 | 2.5" | tl | |
| lab 100 -58 127 | cmyk 100 0 0 0 | 7 | 300 | true | top left |
| Tangerine | 0 100 0 0 | 8 | 300 | rightBottom | |
| lab 100 88 -107 | 0 255 0 | 8 | 5cm | ||
| #EEFFBB | None | .5' | true | ||
| 155, 128, 200 | Foliage | 10 | .15m | c |
Preview the Document
Use the Data-Source button to import the spreadsheet into Darty-Ai.
Next, click the Preview button to turn on Preview Mode.
Once in Preview Mode, you can click the records in the Data grid, to cycle the records and check out the transformations being done to the template.
Updating Data in Preview
You can easily edit the data in Excel, or your spreadsheet editor, and quickly render the new changes in Preview mode.
- First, edit the data in the spreadsheet application.
- Next, use the Reload Data button in the Data tab to update the data in Darty-Ai.
- Finally, click the row of interest to preview it again with the new data.
Export the Document
- Head over to the Export tab.
- In this tab, first set a valid destination directory for the export. It could be selected with the folder-select button, or typed/pasted into the text-box.
- Then, insert an output counter-variable into the
File Nametext-box to satisfy the export validation requirement. - Go to the Export Templates section and add the current document as an export-template.
- Proceed to the bottom of the Export tab. The Export button should now be green. Press the button to activate the Export process.
At this point you can watch the progress results come in as the records are exported.
Upon completion you can click the Folder icon-buttons in the results-table to reveal the location of output files in Finder or Explorer.
Challenge 1: Color the Fill
Now, let's add more dynamic styling to the artwork by colorizing the circle's fill.
- In the spreadsheet, add a new column.
- Keep row 1 a blank.
- On row 2, write the word
appearance. - On row 3, write
fill[1]color. - On rows 5 and downward in this column, put in some sample color values such as hex values (#F00, #F0F, etc).
After this is done, click the Reload Data button to update the Darty data with the new information from the edited spreadsheet.
Now you are ready to preview the template again, this time take note of the colorization which should be happening to the circle's fill.
Challenge 2: Add a Second Fill
Adding a second fill to this circle is easy: simply duplicate the previous column and change fill[1]color to fill[2]color as well as shuffle the row-data to ensure the two color columns are not the same per row.
Go through the preview procedure again, examining the circle via the Appearance Panel to see multiple fills.
Challenge 3: Add an Effect
Complete the beginner's training of Darty-Ai by adding an Offset Path effect to the second fill with a negative value to that both fills are visible when previewing.
To accomplish this, add a new column and explore the documentation on Effect Properties / Offset Path to find out what parameter names are used for the Offset Path effect and fill out this column's Darty header.
If you successfully add this effect, both fills will be visible when the Preview mode is turned on.