# Appearance - General
# Introduction
🧑🎓 Illustrator objects consist of paint fields, i.e. strokes and fills. Darty-Ai's appearance method offers ultra fine control of objects appearances. Allowing you to automate the vast majority of properties in Illustrators Appearance and Transparency panels by easily targeting both basic (top level) and indexed strokes and fills. The appearance method can be applied to both tagged artwork and entire layers.
# Appearance of Artwork and Layers
To change the apperance of tagged artwork, either enter the tag search in the top line of the spreadsheet's header or place an * in the header and use the tagSearch property.
To change the apperance of artwork currently on an entire layer, user either the case sensitive layerName or the layerNumber properties. Using the appearance properties on a layer provides an easy way to apply complex appearance properties to all texts and artwork on a layer. If both a tag and layer are provided, the tag will be ignored. Our plan for future versions of Darty-Ai to enable setting the appearance properties to the actual layer, which will then apply the appearance also to artwork added to the layer afterwards.
# Basic Strokes and Fills
For objects that have a single stroke and fill, or to modify the highest-level (lowest index) stroke and fill, properties like fillColor, strokeColor, and strokeWidth can be used.
See Basic Stroke and Fill Properties.
# Indexed Strokes and Fills
To target specific strokes or fills, indexes are provided to the strokes and fills.
fill[2]color change the color of the second fill from the top of the appearance panel
stroke[3]width change the width of the third stroke from the top of the appearance panel paint[1]color change the color of the first paint field from the top of the appearance panel
See Stroke, Fill, and Effect Indexes and the example appearance spreadsheet.
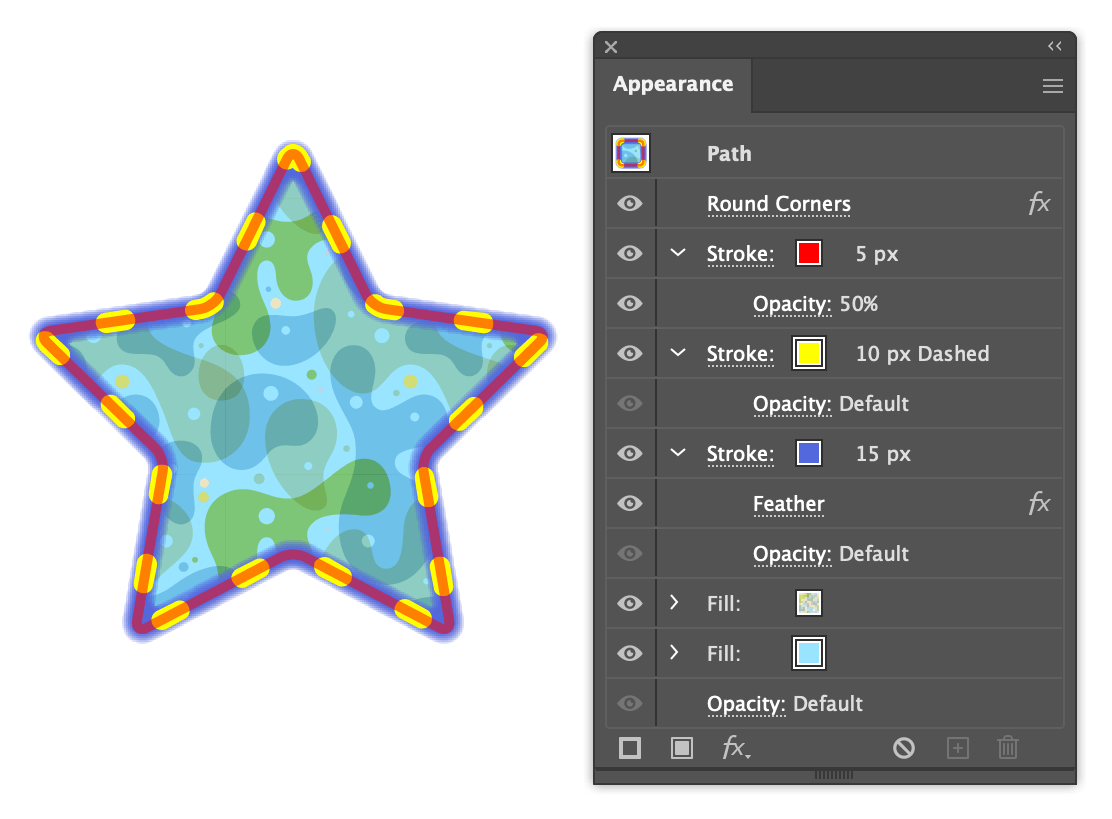
# Example Appearance Spreadsheet
This spreadsheet demonstrates how to apply the appearance properties shown in the appearance panel screenshot. The values in the top data row in the spreadsheet are the values shown in the screenshot.
# appearance-example-1.csv
| star | |||||||||||||||
| appearance | |||||||||||||||
| strokeColor | strokeWidth | strokeOpacity | stroke[2]Color | stroke[2]width | stroke[2]dashValues | stroke[2]dashAlignment | stroke[3]Color | stroke[3]width | stroke[3]effect[1]name: feather | stroke[3]effect[1]radius: 5pt | fill[1]Color | fill[2]Color | effect[1]name: roundCorners | effect[1]radius | replace: true |
| (Optional Labels) | Try swapping to false | ||||||||||||||
| red | 5 | 50 | yellow | 10 | 10, 35 | adjust | #5468dd | 15 | feather | 5pt | Alyssa | #99e5ff | roundCorners | 5 | true |
| "Violet Blue" | 6 | 60 | sugarPlum | 11 | 11, 12, 30 | true | cmyk 50, 30, 70 | 16 | feather | 5pt | red | #abcdef | roundCorners | true | |
| cmyk 100 0 0 0 | 7 | 70 | lab 100 -58 127 | 12 | [12, 40] | preserve | #BEEFEE | 17 | feather | 5pt | cmyk 100 0 0 0 | #fedcba | roundCorners | 10 | true |
| cmyk 0 100 0 0 | 8 | 80 | lab 100 88 87 | 13 | 20, 30 | false | #DECADE | 18 | feather | 5pt | lab 100 88 87 | lab 100 88 87 | roundCorners | true | |
| None | rgb #EEFFBB | 14 | [20, 30, 40] | true | #D0000D | 19 | feather | 5pt | None | skyblue | roundCorners | 8 | true | ||
| Foliage | 10 | 100 | rgb 255, 128, 0 | 15 | 15 | yes | cmyk 15 0 71 0 | 20 | feather | 5pt | "R=255 G=0 B=0" | raspberry | roundCorners | true |
Use the scrollbar 👆 to see all the properties in the table
# Modes
😧
There could be one of several things one wants to do when targeting a paint field, add a new paint field or remove, edit and replace an existing one.
To select the needed task one uses the mode property. The default mode is addEdit, this mode means that if the paint fill does not exist it will be added, if it does it will be edited.
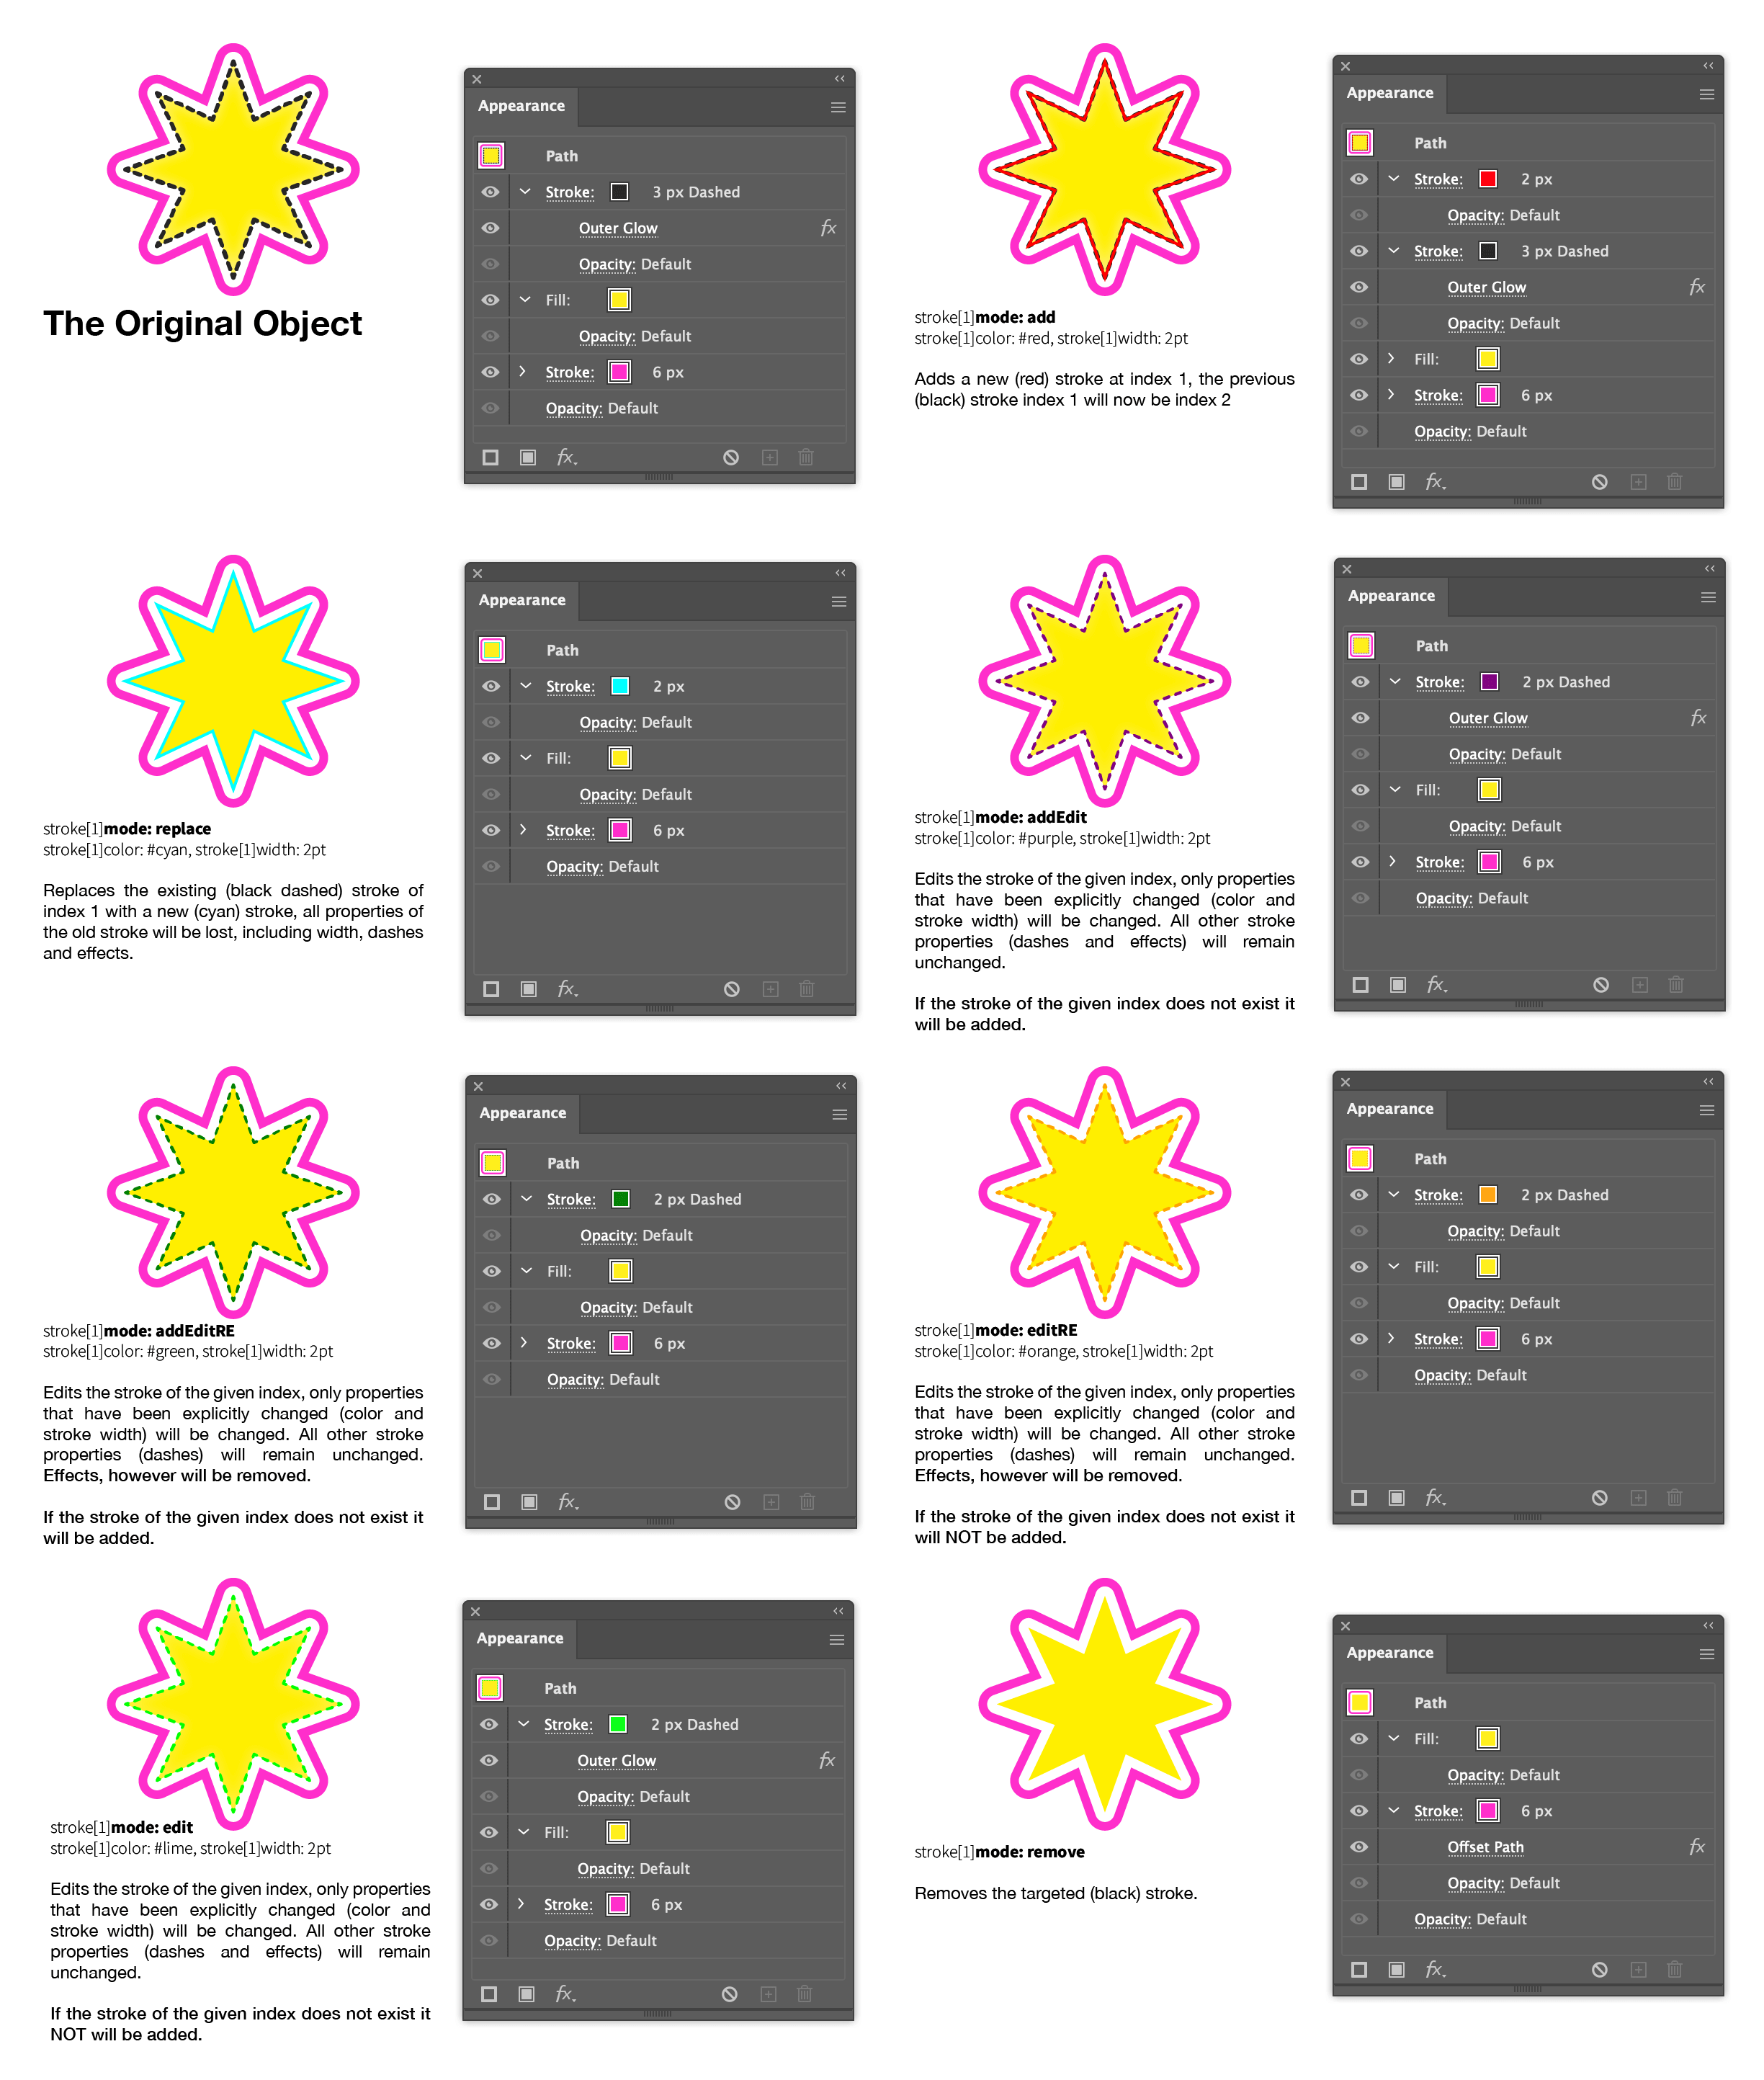
Compare each row in the spreadsheet below with its associated screenshot above.
# appearance-modes.csv
| star | ||
| appearance | ||
| stroke[1]mode | stroke[1]color | stroke[1]width: 2pt |
| See associated graphic 👆 | ||
| add | red | 2pt |
| replace | cyan | 2pt |
| addEdit | purple | 2pt |
| addEditRE | green | 2pt |
| editRE | orange | 2pt |
| edit | lime | 2pt |
| remove |
| Mode | Description |
|---|---|
add | Adds / inserts a new paint field at the given index |
addEdit | Edits an existing paint field, existing properties will be kept besides those explicitly changed. If the paint field does not exist it will be added. This is the default mode. |
addEditRE | Edits an existing paint field, existing properties will be kept besides those explicitly changed. Effects however, will be removed from the paint field. If the paint field does not exist it will be added. |
edit | Edits an existing paint field, existing properties will be kept besides those explicitly changed. If the paint field does not exist it will NOT be added. |
editRE | Edits an existing paint field, existing properties will be kept besides those explicitly changed. Effects however, will be removed from the paint field. If the paint field does not exist it will NOT be added. |
remove | Removes the targeted paint field |
replace | Replaces all existing properties including effect from the targeted paint field with newly provided properties |
# Effects
Effects can be applied to the entire object as pre and post effects (applied in Illustrator using the main top Effect menu item) or to individual strokes and fills (applied in Illustrator using the appearance panel). Pre-effects appear above all the strokes and fills in the appearance panel and post-effects appear below them. It can be difficult to remember which effects are pre and which are post. Instead of using preEffect and postEffect one can use effect to automatically assign the effects as a pre or post effect.
Examples:
effect[1]name Set the name of the first effect, it will be assigned appropriately as pre or post effect
preEffect[1]name Set the name of the first pre-effect
postEffect[1]name Set the name of the first post-effect
stroke[1]effect[1]name Set the name of the first effect of the first stroke from the top of the appearance panel
See Effect Properties for details on effects.
# Basic Stroke and Fill Properties
# Strokes Panel
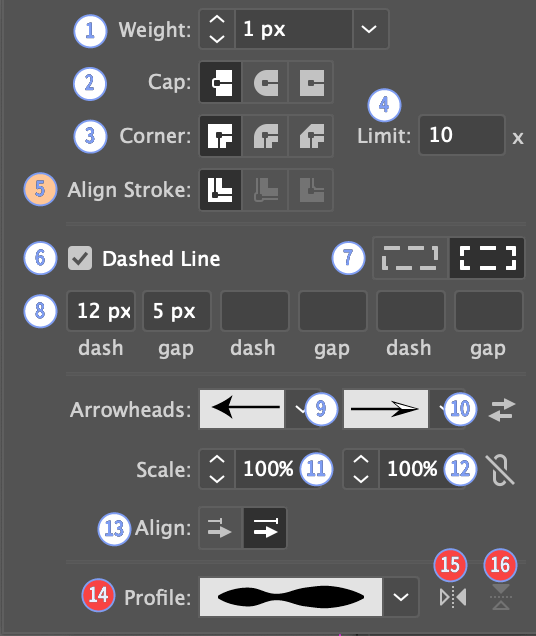
| Property | Description |
|---|---|
arrowAlignment 13 | Whether the end of the arrows extends beyond the line. Valid values: end or (extended beyond extend) |
dashAlignment / adjustDashAlignment 7 | Adjust the dashes to the corners or preserve the exact dash values Valid values: true, false, yes, no, preserve, adjust |
dashValues 8 | A list of up to 6 distance values of lines and gaps of the stroke dashes Example values: [12, 5], 10, 4, 3, [.5", 1mm] Use [] or none for removing dashes Valid units include: ", in, cm, mm, px, pt, pica, p, m, ', ft, yard, yd |
endArrow 9 | The case sensitive name of the end arrow Arrow 1, My Arrow 1 etc. For standard arrows in English Illustrator versions one can also use the arrows index or case insensitive name, 1, arrow1 etc. Use None for no arrowhead |
endArrowScale 11 | Scale of the end arrow from 1 to 1000 % Example values: 25, 50 the % sign should not be included |
strokeAlign 5 | The stroke alignment. Valid values: center, inside, and outside |
startArrow 10 | The case sensitive name of the start arrow Arrow 1, My Arrow 1 etc. For standard arrows in English Illustrator versions one can also use the arrows index or case insensitive name, 1, arrow1 etc. Use None for no arrowhead |
startArrowScale 12 | Scale of the start arrow from 1 to 1000 % Example values: 25, 50 the % sign should not be included |
strokeCap / cap 2 | The stroke cap, Valid values: butt, round, projecting |
strokeCorner / corner 3 | The stroke corner, Valid values: miter, round or bevel |
strokeOpacity | The opacity of the stroke Example values: 25, 50, 100 |
strokeOpacityEnabled | Whether or not the opacity of the stroke is enabled Valid values: true and false |
strokeWeight / strokeWidth / weight / width 1 | The stroke weight Example values: 1, .5", 1mm, 1p3Valid units include: ", in, cm, mm, px, pt, pica, p, m, ', ft, yard, yd |
strokeVisible | Whether or not the stroke is visible Valid values: true and false |
fillOpacity | The opacity of the fill Example values: 25, 50, 100 |
fillOpacityEnabled | Whether or not the opacity of the fill is enabled Valid values: true and false |
fillVisible | Whether or not the fill is visible Valid values: true and false |
🌈 See Individual Color Properties for stroke and fill properties relating to colors. 🎨
# General Appearance Properties
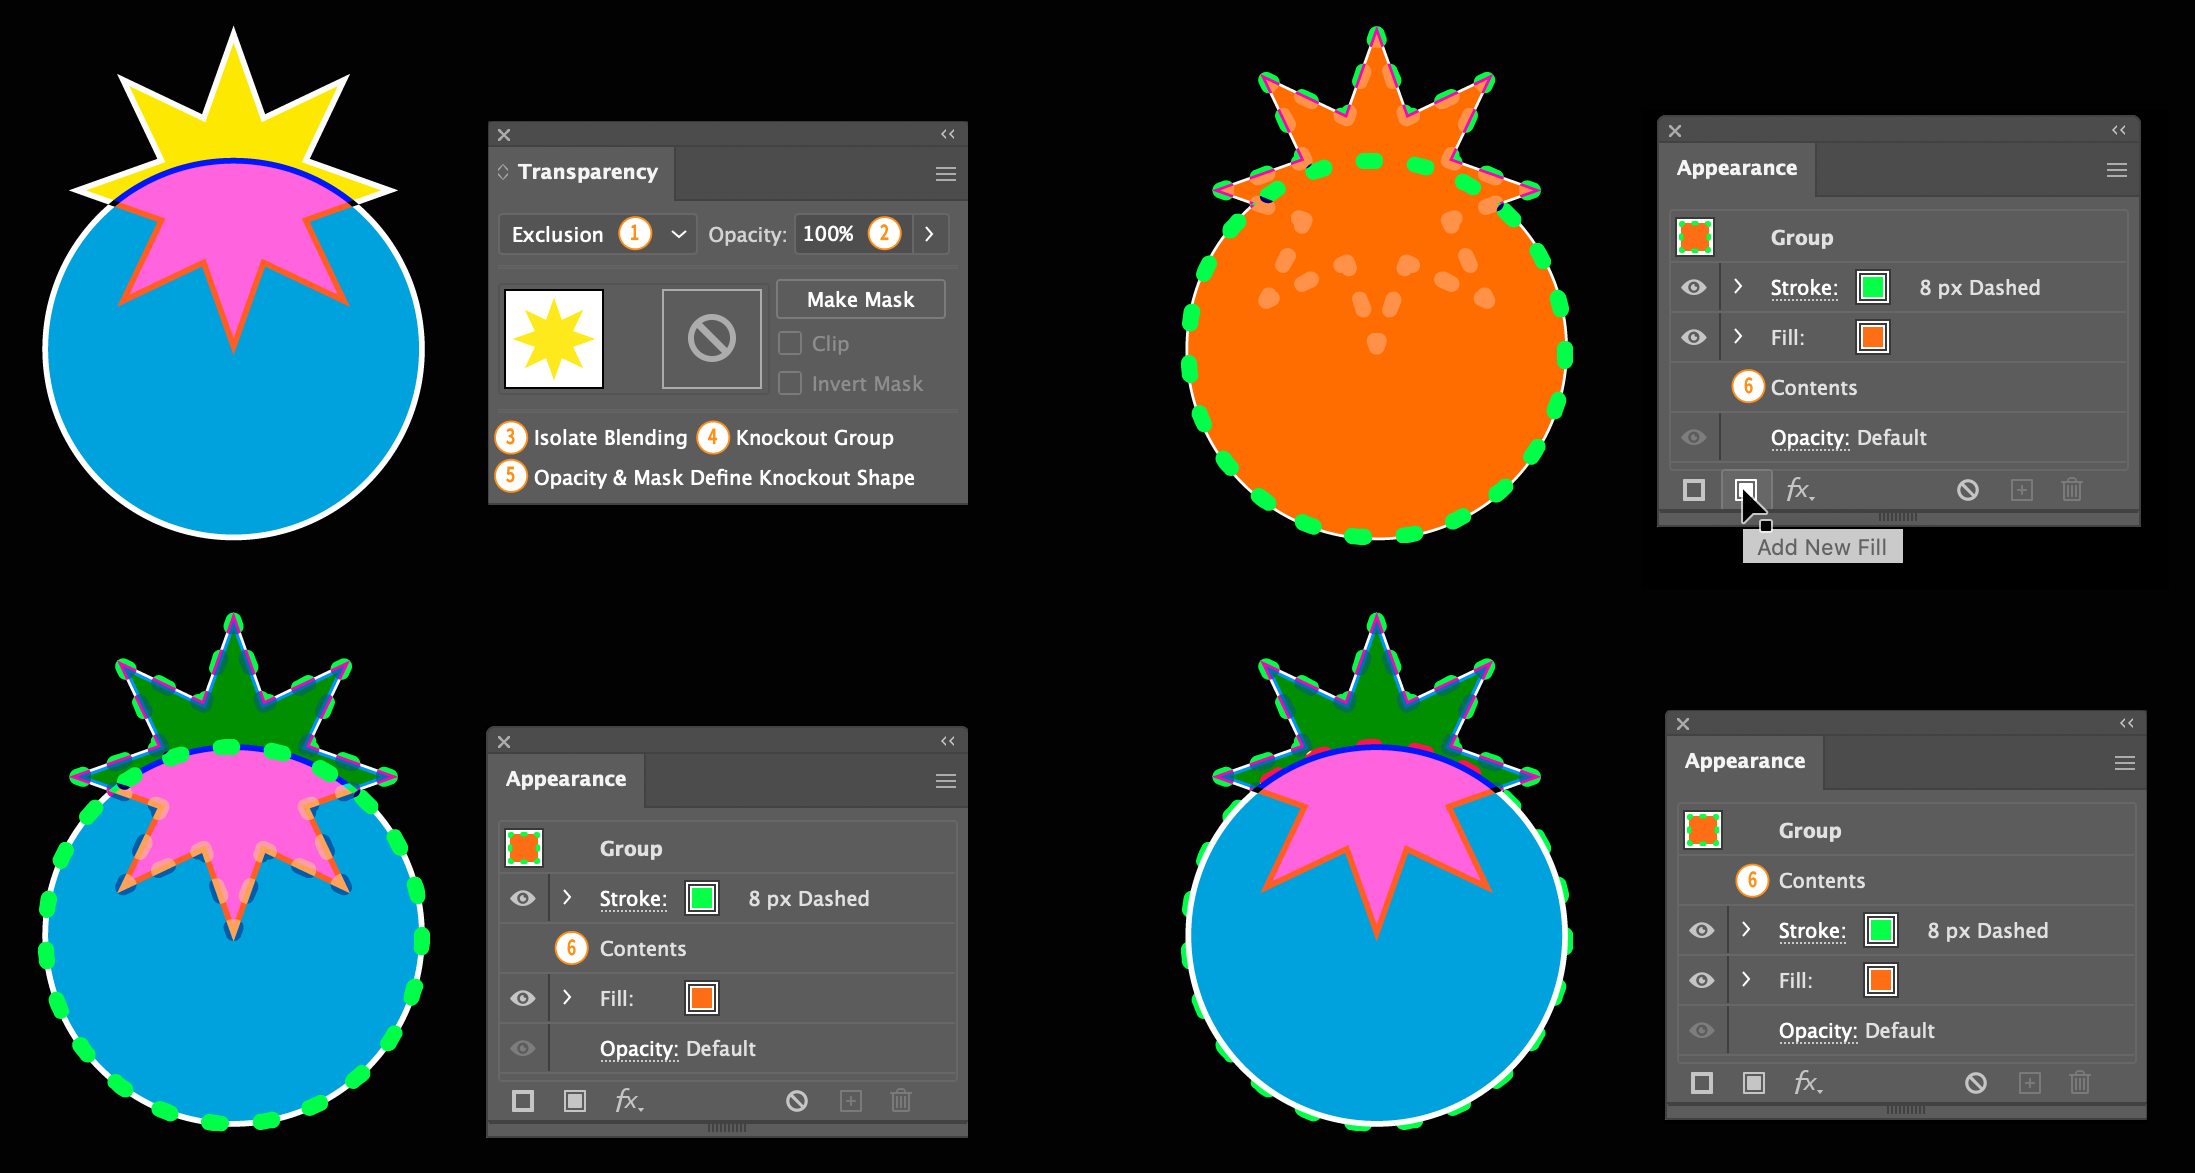
The properties in the below table are rarely required
| Property | Description |
|---|---|
blendMode / blendingMode / blending 1 | The blend mode to apply to the object Example Values: normal, multiply, screen, overlay, softLight soft, hardLight hard, colorDodge dodge, colorBurn burn, darken, lighten, difference, exclusion, hue, saturation, color, luminosity |
contentsPosition 6 | When one adds a fill or stroke to a group, the "Contents" of the group can been seen in the Appearance Panel. Changing the index of the contents changes the z-index of the contents in relation to the other paint fields Valid Values: 1, 2, 3 etc. |
isolateBlending 3 | Whether or not to isolate the blending Example Values: true or false |
knockout 4 | Whether or not to knockout the group Example Values: on / true, off / false, inherit |
opacityDefineKnockout 5 | Equivalent to Opacity & Mask Define Knockout Shape Example Values: true or false |
replace | Whether or not the paint fields that are not adjusted should be removed. For example we have an object with 3 fills and 2 paints, in our new style definition we change the color of stroke 2 and fill 1, if replace is true strokes 1 and 3 and fill 2 will be removed Example Values: true, false |
style | Apply an existing graphic style Valid Values: My Fancy Dancy Existing Graphic Style, Fab Dab etc. |
tagSearch | The search expression for identifying objects by there tags. This will override the value given in the top tag search row of the table. See Tags |
layerName | To apply an appearance of an entire layer including all its artwork and text, provide either its case sensitive layerName or its layerNumber Example Values: Layer 1, Layer 2 |
layerNumber | To apply an appearance of an entire layer including all its artwork and text, provide either its case sensitive layerName or its layerNumber Example Values: 1, 2 |
uiMethod | Whether to color groups like the UI does [default] or not. If false the properties of the group will be changed and not the properties of their contents. Example Values: true, false |
applyEffectsToGroupMembers | If both uiMethod and applyEffectsToGroupMembers are set to true the effect will be applied to the members of a group and not the group itself. Example Values: true, false [DEFAULT] |
opacity | The opacity of the object Example values: 25, 50, 100 |
opacityEnabled | Whether or not the opacity of the object is enabled Valid values: true and false |
visible | Whether or not the paint field is visible Valid values: true and false |
For setting whether or not an object is closed see the Attributes method.
# Stroke, Fill, and Effect Indexes
Indexes are only required for effects or targeting specific paint fields as you would in the appearance panel
Paint fields i.e. strokes or fills are targeted using stroke, fill or paint followed by a one based index.
fill[1]color, stroke[2]width, paint[1]color
Effects can be:
- pre-effects, normally vector effects, applied before all the strokes and fills.
- post-effects, normally raster effects, applied after all the strokes and fills.
- paint-field effects, either vector or raster effects, applied to a specific fills or strokes.
As it's hard to remember which effects are pre-effects and which are post-effects one can use effect without specifying whether or not it's a pre or post effect. But if you are a real geek you might want to use preEffect and postEffect as well 🤓.
effect[1]name, preEffect[1]radius, postEffect[1]blur, and stroke[1]effect[1]name are examples of how to use indexes with effects.
In the screenshot below one can see the different indexes that can be used to target the same paint fields. The red and green targets on each row refer to the same target.
For the shown shape, the first effect is the first pre-effect, the first paint field is the first stroke, the second paint field is the first fill field.
In nearly all cases one can refer to stroke fill and effect and not paint preEffect and postEffect, they are really simple to use.
See the example appearance spreadsheet for practical examples of how to use indexes.
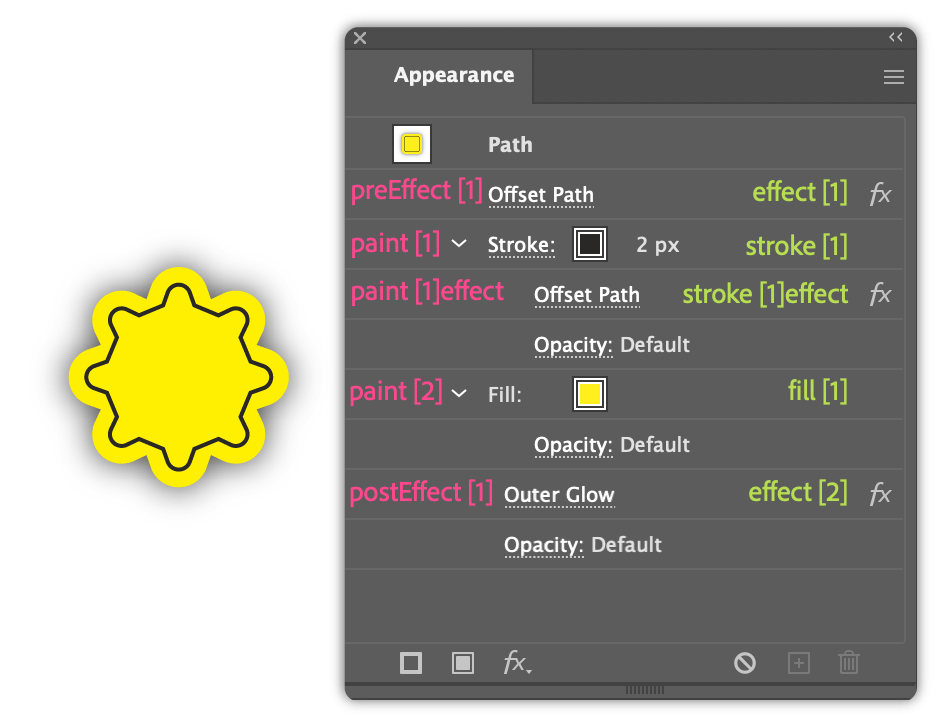
All the properties in this table need to be followed by a bracketed index and a sub-property. For example fill[1]color
| Property | Description |
|---|---|
effect | The objects or a paint fields effect index. See Effect Properties valid properties that can go after the index. Example values: effect[1]name effect[2]color stroke[1]effect[1]name |
fill | The objects fill index. See Indexed Stroke and Fill Properties valid properties that can go after the index. Example values: fill[1]opacity fill[1]color |
paint | The objects paint index. See Indexed Stroke and Fill Properties valid properties that can go after the index. Example values: paint[1]isFill paint[3]color |
postEffect | The objects post-effect index. See Effect Properties valid properties that can go after the index. Example values: preEffect[1]name preEffect[3]color |
preEffect | The objects pre-effect index. See Effect Properties valid properties that can go after the index. Example values: postEffect[1]name postEffect[2]color |
stroke | The objects stroke index. See Indexed Stroke and Fill Properties valid properties that can go after the index. Example values: stoke[1]width stoke[2]color |
# Grouping Indexes
It is highly advisable to group all properties of strokes, fills etc. of the same index together as there are cases where their will be undesirable results if they are not.
For example if in the below spreadsheet the stroke[red]effect[2]name and the fill[2]index were swapped the dynamic indexes of both red and 2 would not be preserved.
# Dynamic Indexes
In addition to declaring the index value inside brackets in the properties row of the spreadsheet one can dynamically give values to the indexes in the data section of the spreadsheet. 👆🏼 One can then use descriptive words in the brackets in place of numbers.
# dynamic-indexes.csv
| star | |||||
| appearance | |||||
| stroke[red]index | stroke[red]color:red | stroke[red]effect[2]name | stroke[red]weight | fill[2]index | fill[2]color:blue |
| Descriptive index | [2] Could be confusing | ||||
| 1 | red | roundCorners | 4 | blue | |
| 2 | red | zigzag | 3 | blue | |
| 3 | red | roughen | 2 | blue | |
| 4 | red | tweak | 4 | 1 | blue |
Valid properties for setting indexes using the data rows are index, fillIndex, strokeIndex and paintIndex
# Indexed Stroke and Fill Properties
These properties are applied to targeted stroke, fill or paint fields, for example stroke[2]width
| Property | Description |
|---|---|
arrowAlignment 13 | Whether the end of the arrows extends beyond the line. Valid values: end or (extended beyond extend) |
blendMode / blendingMode / blending 1 | The blend mode to apply to the effect Example Values: normal, multiply, screen, overlay, softLight soft, hardLight hard, colorDodge dodge, colorBurn burn, darken, lighten, difference, exclusion, hue, saturation, color, luminosity |
dashAlignment / adjustDashAlignment 7 | Whether to adjust the dashes to the corners Valid values: true, false, yes, no, preserve or adjust |
dashValues 8 | A list of up to 6 values of lines and gaps of the stroke dashes Example values: [12, 5], 10, 4, 3mm |
effect | For adding effects to paint fields, see Stroke, Fill, and Effect Indexes, Effects and Effect Properties Examples effect[1]name, effect[1]mode, effect[2]blur etc. |
endArrow 9 | The case sensitive name of the end arrow Arrow 1, My Arrow 1 etc. For standard arrows in English Illustrator versions one can also use the arrows index or case insensitive name, 1, arrow1 etc.Use None for no arrowhead |
endArrowScale 11 | Scale of the end arrow from 1 to 1000 % Example values: 25, 50 the % sign should not be included |
fillIndex | The fill index of paint field, if an object had a stroke, fill and stroke, the first stroke would have a paintIndex of 1 and a stroke index of 1, the first fill would have a paint index of 2 and a fill index of 1, the second stroke would have a paint index of 3 and a stroke index of 2. this overrides any index provided in the properties row of the spreadsheet. See Stroke, Fill, and Effect Indexes Example Values: 1, 2, 3, 4 etc. |
index | The index of the paint field, the index will be of the property specified, i.e. stroke[red]index will be a stroke stroke index, fill[2]index fill be a fill index, paint[blue]index will be a paint index. See Dynamic Indexes. This overrides any index provided in the properties row of the spreadsheetExample Values: 1, 2, 3, 4 etc. |
isFill | Whether or not the paint field is a fill or stroke. By default, existing paint fields will remain as they are, strokes will remain strokes and fills will remain fills. For new paint fields, if the index used was a stoke index, i.e. one used stroke[2]color or one set the index using strokeIndex or set a stroke specific property like arrowAlignment then the field will be stroke field, otherwise it will be a fill field.Valid Values: true or false |
isolateBlending 3 | Whether or not to isolate the blending, see General Appearance Properties Example Values: true or false |
knockout 4 | Whether or not to knockout the group, see General Appearance Properties Example Values: true or false |
mode | The type of action that should be applied to the paint field, see Modes for a description of each mode. The default mode is addEdit, this mode will add a new paint field if the targeted one does not exist and edit it, if it does exist.Example Values: add, addEdit , addEditRE , edit , editRE , replace and remove |
opacity 7 | The opacity of the paint field Example values: 25, 50, 100 |
opacityEnabled 8 | Whether or not the opacity of the paint field is enabled Valid values: true and false |
opacityDefineKnockout 5 | Equivalent to Opacity & Mask Define Knockout Shape, see General Appearance Properties Example Values: true or false |
paintIndex | The index of paint field, if an object had a stroke, fill and stroke, the first stroke would have a paintIndex of 1 and a stroke index of 1, the first fill would have a paint index of 2 and a fill index of 1, the second stroke would have a paint index of 3 and a stroke index of 2. this overrides any index provided in the properties row of the spreadsheet. See Stroke, Fill, and Effect Indexes Example Values: 1, 2, 3, 4 etc. |
paintIndex | The index of paint field, if an object had a stroke, fill and stroke, the first stroke would have a paintIndex of 1 and a stroke index of 1, the first fill would have a paint index of 2 and a fill index of 1, the second stroke would have a paint index of 3 and a stroke index of 2. this overrides any index provided in the properties row of the spreadsheet. See Stroke, Fill, and Effect Indexes Example Values: 1, 2, 3, 4 etc. |
strokeAlign 5 | The stroke alignment. Valid values: center, inside, and outside |
startArrow 10 | The case sensitive name of the start arrow Arrow 1, My Arrow 1 etc. For standard arrows in English Illustrator versions one can also use the arrows index or case insensitive name, 1, arrow1 etc.Use None for no arrowhead |
startArrowScale 12 | Scale of the start arrow from 1 to 1000 % Example values: 25, 50 the % sign should not be included |
strokeCap / cap 2 | The stroke cap, Valid values: butt, round, projecting |
strokeCorner / corner 3 | The stroke corner join type Example Values: miter, round or bevel |
strokeIndex | The stroke index of paint field, if an object had a stroke, fill and stroke, the first stroke would have a paintIndex of 1 and a stroke index of 1, the first fill would have a paint index of 2 and a fill index of 1, the second stroke would have a paint index of 3 and a stroke index of 2. this overrides any index provided in the properties row of the spreadsheet. See Stroke, Fill, and Effect Indexes Example Values: 1, 2, 3, 4 etc. |
strokeWeight / strokeWidth / weight / width 1 | The stroke weight Example values: 1, .5", 1mm, 1p3Valid units include: ", in, cm, mm, px, pt, pica, p, m, ', ft, yard, yd |
visible | Whether or not a given paint field is visible Valid Values: true and false |
🌈 See Individual Color Properties for stroke and fill properties relating to colors. 🎨