
Fit to Bounds Tool
Use Tools → Methods → Fit to Bounds to resize one or more Illustrator artboards around the visible bounds of qualifying artwork. The method is useful for trimming artboards to generated content, adding repeatable bleed or whitespace, or keeping selected edges fixed while other edges follow the artwork.
Fit to Bounds changes the artboard rectangle only. It does not move, stretch, or scale the artwork, and it does not offer an anchor control. The artwork bounds and padding determine the resulting edges; the artboard's center and dimensions follow from that rectangle.
For spreadsheet aliases and illustrated examples, see the Fit to Bounds method reference.
Fit to Bounds Editor
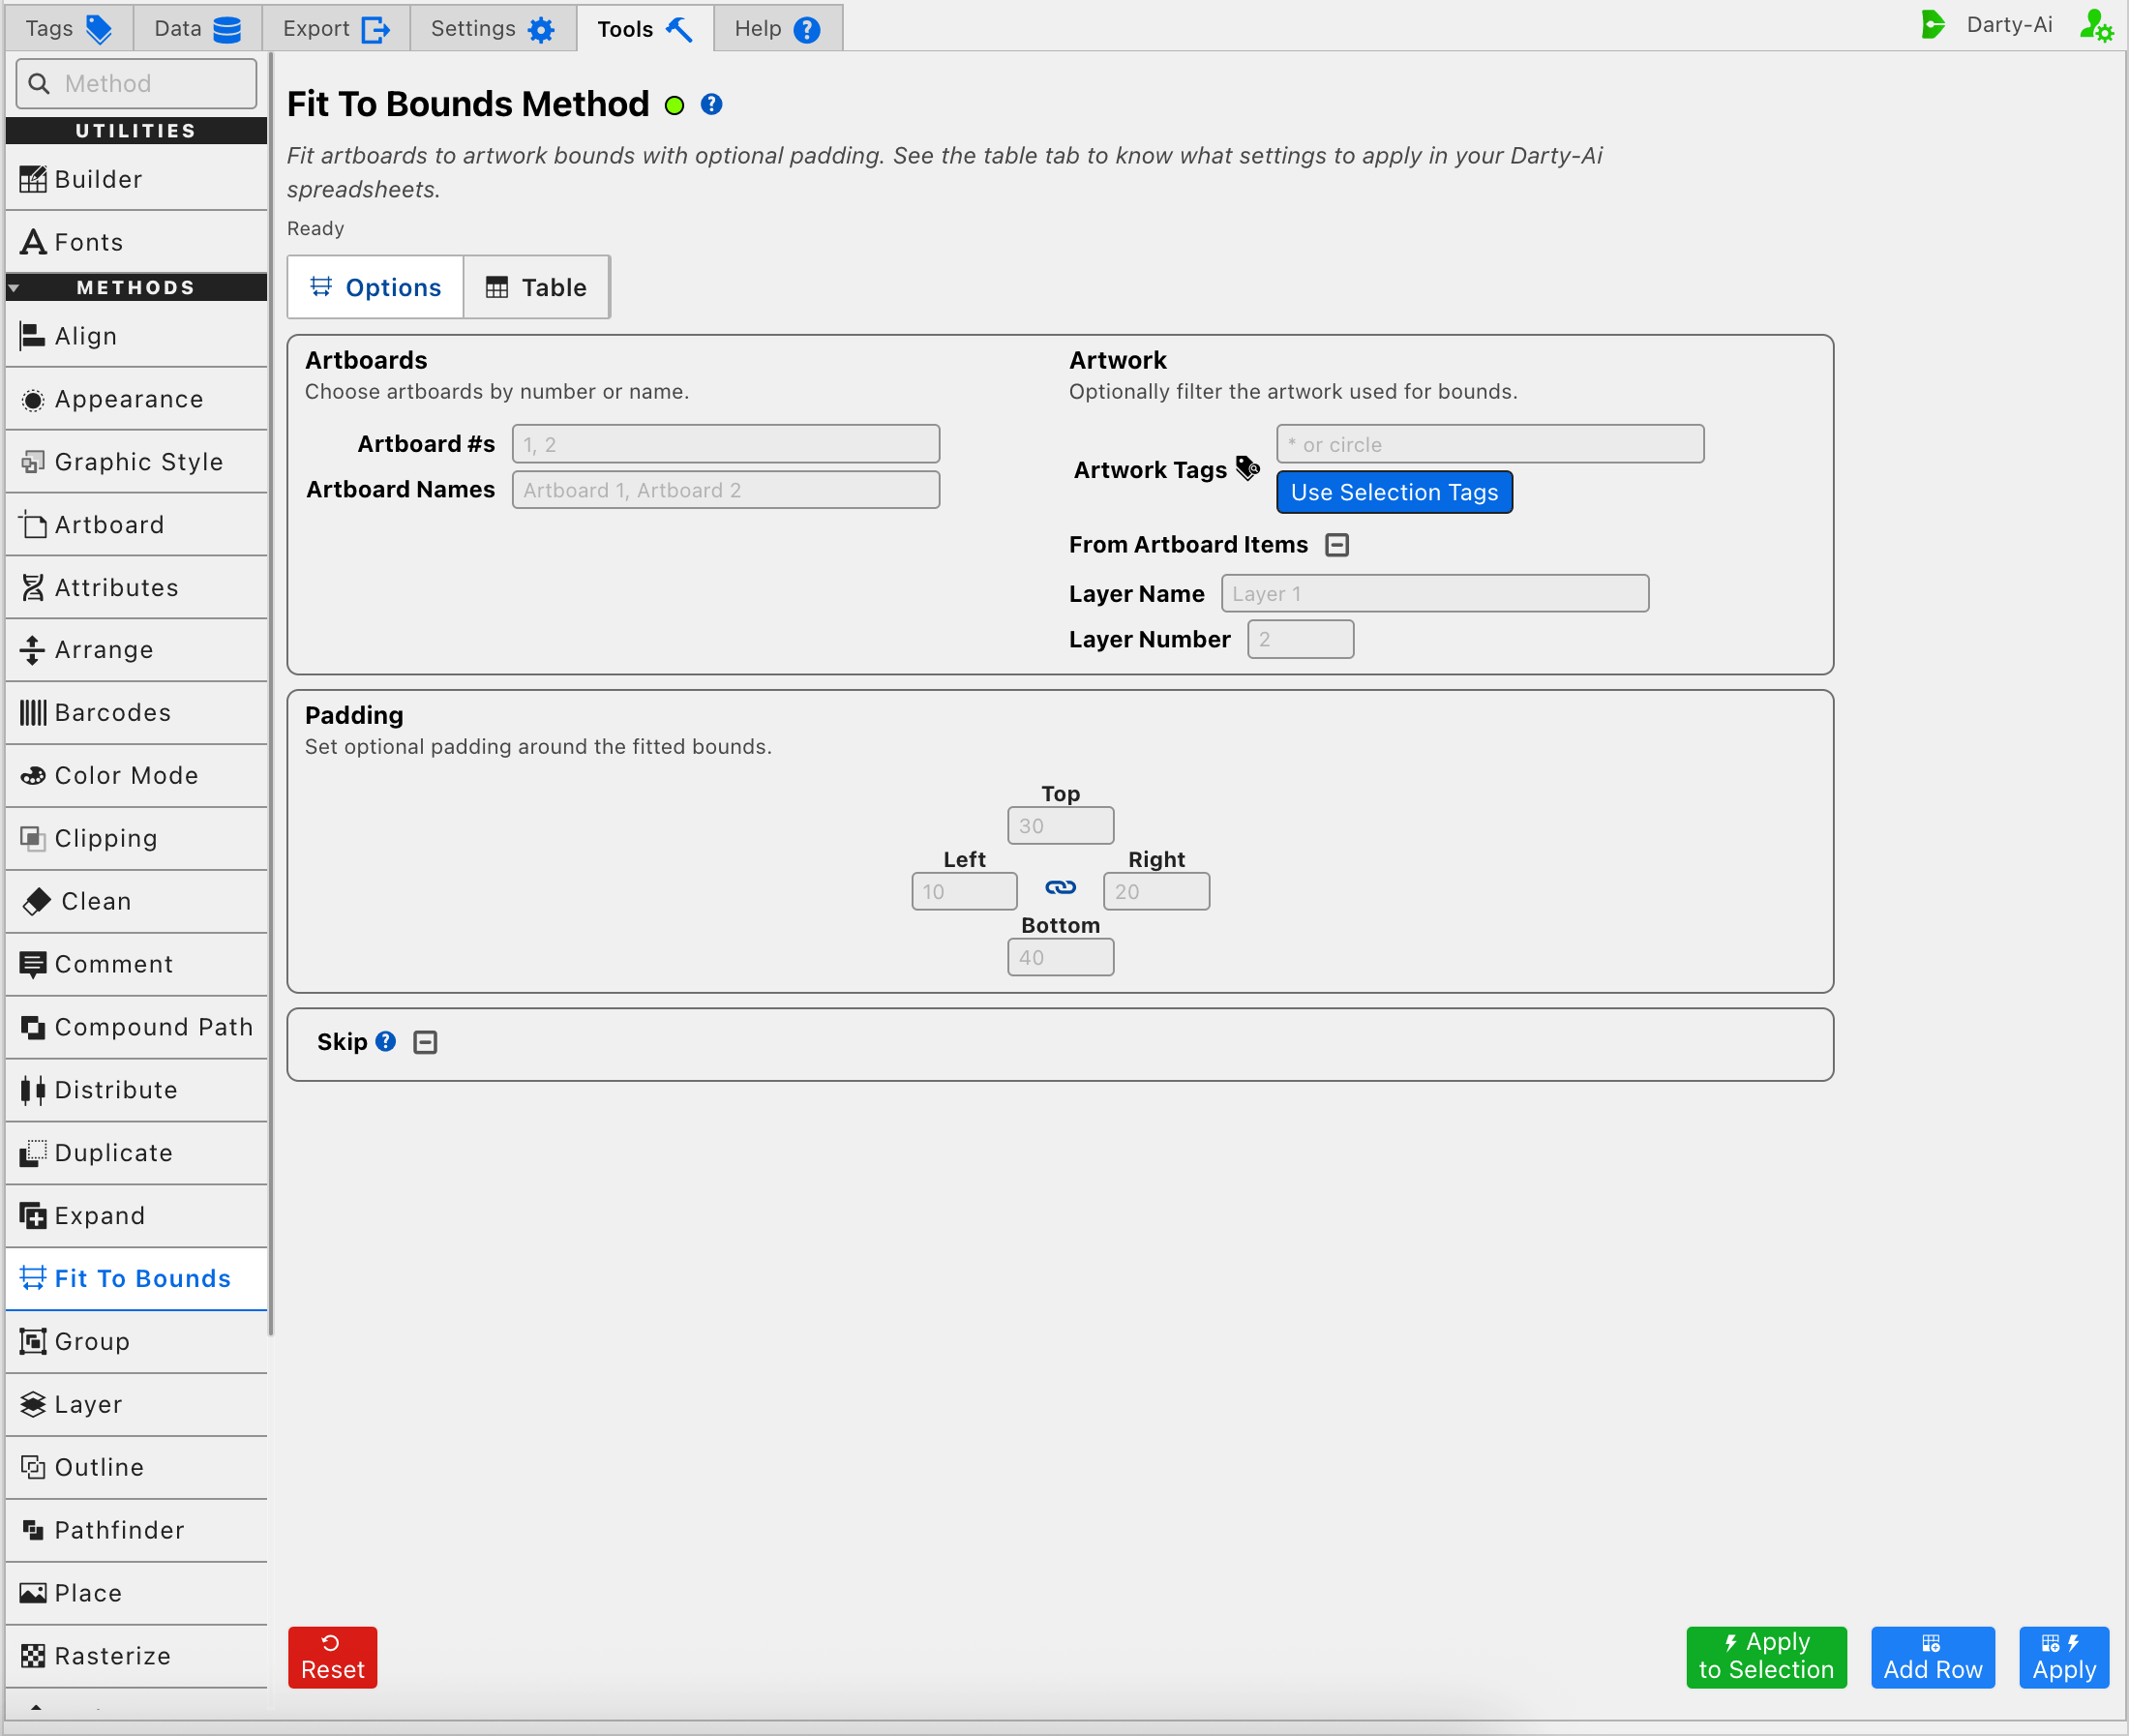
The editor separates three decisions:
- Which artboards should change?
- Which artwork should define their new bounds?
- Which artboard edges should follow that artwork, and with how much padding?
Choose the Artboards to Resize
Use Artboard #s or Artboard Names to limit the operation to specific artboards.
- Artboard #s writes
artboardNumbers. Enter one-based Illustrator numbers separated by commas, such as1, 2. - Artboard Names writes
artboardNames. Enter exact, case-sensitive names separated by commas, such asFront, Back.
You may use either field or both. When both contain valid identifiers, Darty combines the unique matches. Leaving both blank makes all artboards eligible.
The editor does not verify artboard identifiers before adding a row. Check names and numbers carefully: an invalid number can result in no change for that entry, while a set of names that resolves to no artboard can fall back to considering all artboards. Stable names are often clearer in a reusable sheet; numbers are convenient when the document's artboard order is fixed.
These fields choose the artboards that change. They do not choose the artwork used to measure the bounds.
Choose the Artwork That Defines the Bounds
The Artwork section narrows the measurement source. Its filters work together, so a configuration can first select artwork by tags, then limit it to artboard overlap and a particular layer.
Filter by Darty Tags
Artwork Tags becomes the row's target search. Enter a Darty search such as circle, front | back, or another supported expression. If it is left blank, the Table preview normalizes the target to *, allowing all otherwise eligible artwork to be considered.
Use Selection Tags reads the existing Darty tags from the current Illustrator selection and copies them into Artwork Tags. It does not fit an artboard or create new tags by itself. See Darty Tags for search operators.
Apply to Selection is different: it performs a one-time fit using the artwork currently selected in Illustrator, without changing Artwork Tags or adding a Table row. The selected artwork supplies the measured bounds; Artboard #s and Artboard Names still decide which artboards are resized.
Decide Whether Artwork Must Overlap Each Artboard
From Artboard Items writes fromArtboardItems and uses a three-state checkbox:
| Checkbox state | Generated value | Artwork used for each chosen artboard |
|---|---|---|
| True | true | Only qualifying artwork whose visible bounds overlap that artboard. |
| False | false | All qualifying artwork in the document, even when it lies outside that artboard. |
| Unset | Property omitted | Uses the method default, which is the same behavior as True. |
True or Unset usually gives each artboard its own local fit. An object only needs to overlap the current artboard; it does not have to sit completely inside it.
False deliberately gives every selected artboard the same complete source set. For example, with two chosen artboards and Artwork Tags set to product, both artboards fit around all matching product artwork in the document. This is useful when several artboards need identical bounds, but it can make distant artboards jump to the same document-wide rectangle.
Limit the Artwork to a Layer
Use Layer Name or Layer Number when only artwork on one Illustrator layer should contribute to the measurement.
- Layer Name writes
layerNameand expects the exact layer name. - Layer Number writes
layerNumberand uses one-based layer paint order.
When both are present, a valid Layer Number takes precedence. If that number is not found, Darty tries Layer Name. If neither value resolves to a layer, the current implementation applies no layer filter and may use a broader artwork set than intended. For a reusable cleanup or export workflow, use one verified layer identifier rather than relying on fallback behavior.
The layer choice further filters the artwork established by Artwork Tags and From Artboard Items; it does not select which artboards are changed.
Fit the Edges with Padding
The four Padding values write paddingTop, paddingRight, paddingBottom, and paddingLeft. Positive padding expands the corresponding artboard edge away from the artwork. A value of 0 places that edge directly on the visible artwork bound.
Padding accepts Darty measurements such as 12pt, 4mm, or 0.25in. A number without an explicit unit follows the normal Darty unit handling described in the method reference.
Keep All Four Sides Equal
The chain control starts linked. While it is linked, entering or changing any one side copies that value to Top, Right, Bottom, and Left. All four side properties are then written to the row, producing a complete fit with equal padding.
The linked state is an editor convenience; paddingLinked is not written to the Darty sheet. The generated row contains the four side properties themselves.
Set Different Values or Preserve Existing Edges
Turn off the chain when each side needs an independent value. This supports asymmetric whitespace—for example, a larger bottom margin for a caption—or a partial fit that keeps part of the existing artboard in place.
An empty side has a specific meaning: that existing artboard edge is preserved. It does not snap to the artwork with zero padding.
Examples:
- Top
0, Right0, Bottom0, and Left0trim all four edges to the visible artwork bounds. - Top
12pt, Right12pt, Bottom24pt, and Left12ptcreates extra space below the artwork. - Left
0with the other sides blank moves only the left artboard edge to the artwork's left bound; the current top, right, and bottom edges remain where they are. - Leaving every padding field blank preserves all four current edges, so the operation produces no geometric change even when artwork and artboards are identified.
The spreadsheet method also accepts the single padding property for equal padding on all sides. The current Tools editor represents equal padding by linking and writing all four side properties instead.
Understand the Bounds Used
Fit to Bounds measures visible artwork bounds. Strokes and other visible extensions can therefore influence the fitted rectangle; the method does not expose a geometric-bounds or preview-bounds switch.
There is also no scale mode or anchor choice:
- Artwork remains at its existing size and position.
- The artboard edges move around the measured artwork.
- When all four edges are fitted, the resulting artboard center follows the center of the padded artwork rectangle.
- When one or more sides are blank, those existing artboard edges remain fixed and the new center follows from the mix of fitted and preserved edges.
Use Transform, Scale, or another artwork method separately when the artwork itself needs to change size.
Skip a Reusable Fit Row
Skip writes skip and determines whether this method runs for the current data record.
- True writes
skip:trueand bypasses Fit to Bounds. - False writes
skip:falseand explicitly allows it to run. - Unset omits the property and allows normal execution.
Skip is useful when artboards should be fitted only for some records in a larger sheet. See Skip and *.
Validation, Errors, and Broad Fallbacks
The editor can capture a row without first proving that its artboard names, artboard numbers, tags, or layer identifiers exist in the active Illustrator document. Add Row is therefore a serialization preview, not a document-content validation.
Before applying, check these conditions:
- At least one intended artboard resolves, or both artboard fields are deliberately blank to target all artboards.
- The tag search or current selection finds artwork.
- From Artboard Items does not exclude every candidate because none overlap the chosen artboard.
- A layer filter resolves when one was intended.
- At least one padding edge has a value when an artboard edge should actually move.
If no eligible artwork remains after the filters are combined, Illustrator reports No artboard items to fit. Correct the tag, overlap, selection, or layer scope and try again.
If the operation completes but an artboard does not move, first check for blank padding edges. If more artboards or artwork changed than expected, verify unresolved artboard names, the layer identifier, and whether From Artboard Items was set to False.
Build a Practical Fit Configuration
A reliable order is:
- Enter exact artboard names or one-based numbers, or deliberately leave both blank for every artboard.
- Enter Artwork Tags, use tags from the current selection, or plan a one-time Apply to Selection test.
- Leave From Artboard Items Unset for an artboard-local fit, or set it to False only when every chosen artboard should use the complete filtered artwork set.
- Add one verified layer identifier when the measurement should come from a single layer.
- Keep padding linked for equal margins, or unlink it for asymmetric padding or preserved edges.
- Enter
0on every edge that should touch the artwork, rather than leaving those fields blank. - Use Add Row to inspect the reusable properties, Apply to capture and run the row, or Apply to Selection for a one-time fit based on selected artwork.
- Inspect every affected artboard before reusing the configuration across documents.
Control-to-Property Summary
| Editor purpose | Darty property |
|---|---|
| Artboards selected by one-based number | artboardNumbers |
| Artboards selected by exact name | artboardNames |
| Artwork used to calculate bounds | Target header / tagSearch |
| Require artwork to overlap each artboard | fromArtboardItems |
| Restrict artwork by layer name | layerName |
| Restrict artwork by layer paint-order number | layerNumber |
| Fit the top edge with padding | paddingTop |
| Fit the right edge with padding | paddingRight |
| Fit the bottom edge with padding | paddingBottom |
| Fit the left edge with padding | paddingLeft |
| Keep side inputs synchronized | Editor only; no generated property |
| Skip the method for a data row | skip |
Capture, Apply, and Review
- Tools Method Actions and Apply Modes explains Reset, Add Row, Apply, and Apply to Selection.
- Tools Method Table Preview explains how to inspect, edit, reorder, copy, download, and apply captured Fit to Bounds rows.
- Fit to Bounds method reference documents aliases, spreadsheet examples, and sample images.