
Transform Tool
Use Tools → Methods → Transform to move, position, resize, rotate, shear, or reflect tagged Illustrator artwork. A single Transform row can combine several of these operations, which makes it useful for data-driven layouts in which each record supplies different coordinates or dimensions.
Transform acts on every object matched by the target search. When several objects share the same tags, Darty applies the configured values to each matched object rather than treating the matches as one combined selection.
For accepted values, aliases, illustrated results, spreadsheet examples, and sample files, see the Transform method reference.
Transform Editor
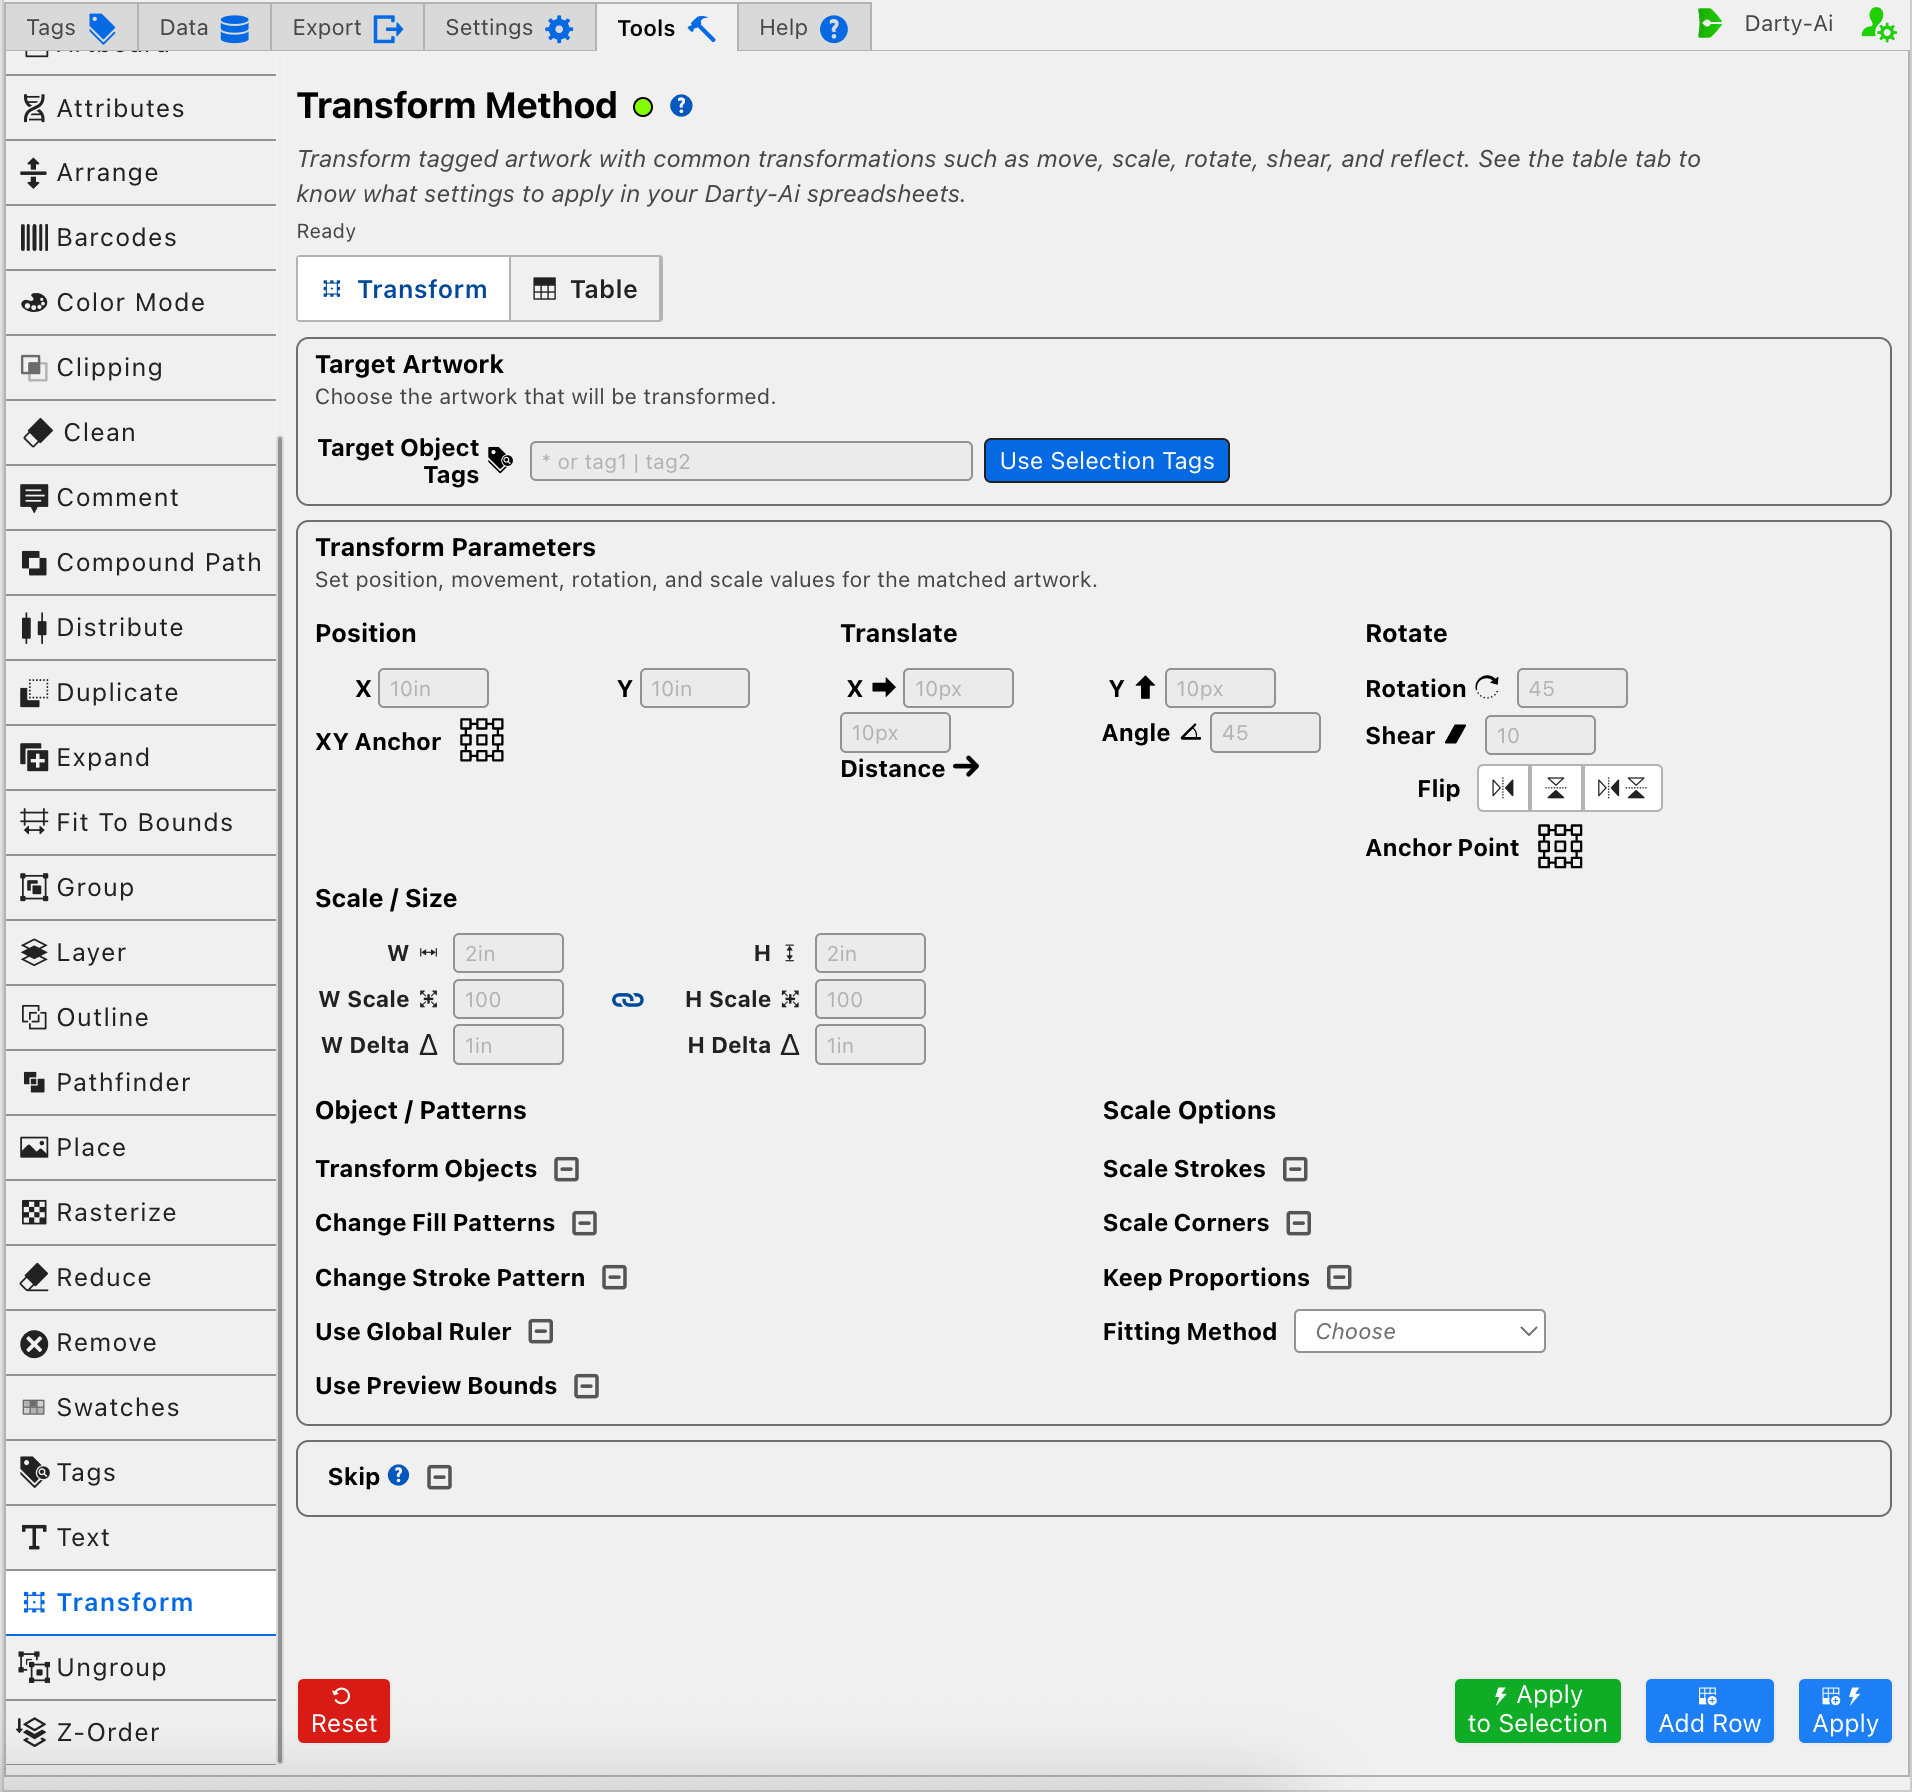
The editor groups the method into five practical decisions:
- Which artwork should change?
- Should the row place it at an exact coordinate or move it relative to its current position?
- Should it rotate, shear, or flip around a chosen point?
- Should its size be set absolutely, proportionally, or by an added difference?
- Should strokes, corners, patterns, and visible bounds participate in the transformation?
Fields shown with example values such as 10in, 10px, 45, or 100 are placeholders. They are not written to the row until you enter a value or explicitly set an option.
Choose the Artwork to Transform
Target Object Tags identifies the artwork that will receive the transformation. Enter a focused Darty tag search such as productImage, badge | price, or another supported expression. See Darty Tags for search operators.
Use Selection Tags reads the Darty tags already attached to the current Illustrator selection and uses them to construct Target Object Tags. It does not transform the selection or create tags.
When Target Object Tags is blank, the generated target header is normalized to *. That broad target can affect every eligible object, so use it deliberately in reusable sheets.
Apply to Selection is the safer choice for a one-time test. It temporarily targets the current Illustrator selection, applies the configured transform, and does not require you to change the reusable tag search first.
Place Artwork at an Exact Position
Use Position when the result should land at a document coordinate rather than move by a distance from its current location.
- X writes
xand sets the horizontal coordinate. - Y writes
yand sets the vertical coordinate. - XY Anchor writes
xyAnchorPointand chooses which point of the transformed artwork is placed at X and Y.
For example, choosing the center XY Anchor and entering X and Y positions the finished object's center at that coordinate. Choosing the top-left anchor positions its top-left reference point there instead.
The nine-point picker supports top-left, top, top-right, left, center, right, bottom-left, bottom, and bottom-right. Leave the picker unset when the method's normal anchor behavior is sufficient.
Choose the Coordinate System
Use Global Ruler is a three-state checkbox that writes useGlobalRuler:
- True interprets X and Y using Illustrator's global ruler coordinates.
- False explicitly uses artboard ruler coordinates.
- Unset omits the property and leaves the method to its normal coordinate behavior.
This option changes how absolute X and Y values are interpreted. It does not affect relative translation values such as Delta X or Delta Y.
Move Artwork Relative to Its Current Position
Use Translate when the artwork should move from wherever it currently sits.
Move Independently on Each Axis
X in the Translate section writes deltaX; Y writes deltaY. Positive and negative distances move the object horizontally or vertically relative to its existing position.
These fields are independent. A row can move only horizontally, only vertically, or on both axes. Unit-bearing values such as 12px, 5mm, or 0.25in make the intended production distance explicit.
Move by Distance and Direction
Distance writes distance, and Angle writes angle. Together they describe a movement vector. If Angle is omitted, the documented default direction is to the right.
Angle controls the direction of movement; it does not rotate the artwork. Use Rotation when the object itself should turn.
Delta X/Y and Distance/Angle are two ways to express relative movement. A reusable row is usually easier to audit when it uses the pair that best describes the job instead of filling both without a specific reason.
Rotate, Shear, and Flip
The Rotate section changes the object's orientation and shape around Anchor Point.
Rotate the Object
Rotation writes rotation as an angle. Positive and negative values turn the object around the selected Anchor Point.
Rotation is distinct from Translate Angle:
- Translate Angle chooses the direction in which Distance moves the object.
- Rotation turns the object around itself.
A row can use both when artwork must move along an angle and also rotate.
Shear the Object
Shear writes shear as an angle. It slants the artwork around the selected Anchor Point without serving as a movement direction.
Use modest values first and test representative artwork. Strong shear values can create very wide visible bounds and may interact noticeably with exact positioning or later fitting operations.
Reflect the Object
Flip writes flip and offers three operations:
| Editor choice | Generated value | Result |
|---|---|---|
| Flip Horizontal | h | Reflect across the vertical axis through the Anchor Point. |
| Flip Vertical | v | Reflect across the horizontal axis through the Anchor Point. |
| Flip Horizontal & Vertical | hv | Reflect on both axes. |
Choosing another flip replaces the current choice. Leave all three unselected when the row should not reflect the artwork.
Choose the Transform Pivot
Anchor Point writes anchorPoint and chooses the pivot used by rotation, shear, flip, and scaling. The same nine-point layout is available as in XY Anchor.
XY Anchor and Anchor Point solve different problems:
- XY Anchor identifies the point placed at the final X/Y coordinate.
- Anchor Point identifies the point around which orientation and size changes occur.
Keeping those choices separate lets a row, for example, rotate around the center and then place the transformed top-left corner at a specific coordinate.
Set Scale or Size
The Scale / Size section offers three paired ways to resize the artwork. Values on the left control width; values on the right control height.
| Editor fields | Generated properties | Use |
|---|---|---|
| W and H | width, height | Set absolute final dimensions. |
| W Scale and H Scale | scaleH, scaleV | Scale each axis as a percentage; 100 keeps the current size, 50 halves it, and 200 doubles it. |
| W Delta and H Delta | widthDiff, heightDiff | Add or subtract a distance from the current dimensions. |
Use negative Delta values to reduce a dimension. Unit-bearing values are appropriate for W, H, and Delta; the Scale fields use percentage numbers.
Although Darty can combine transform properties, a row is easier to predict when one size family expresses the intended result. Avoid setting an absolute size, a scale percentage, and a size difference on the same axis unless their combined behavior is deliberate and has been tested.
Link the Paired Inputs
The blue link control between the width and height stacks starts enabled. While linked, entering a value on one side copies the same entry to the corresponding field on the other side. It synchronizes W with H, W Scale with H Scale, and W Delta with H Delta.
The link is an editor convenience and does not generate a Darty property. Turn it off before entering different horizontal and vertical values.
The link is not the same as Keep Proportions. Copying the same absolute W and H produces equal dimensions, while Keep Proportions asks the transform itself to preserve the artwork's existing aspect ratio.
Control Proportions and Fitting
Keep Proportions is a three-state checkbox that writes keepProportions. When enabled, a single width- or height-based value can resize the other axis proportionally. When both axes are supplied, the documented transform behavior gives the width-based value priority for proportional fitting.
Fitting Method writes fittingMethod and is used with a target Width or Height:
- Shrink selects the mode that reduces artwork when it must fit within the target measurement.
- Enlarge selects the mode that grows artwork toward the target measurement.
- Choose leaves the fitting property out of the row.
This is useful for variable artwork that should change only in one direction. For example, outlined text can retain its normal size until it exceeds a permitted width, then use Shrink to fit. Combine fitting with Keep Proportions when the artwork's aspect ratio must remain unchanged.
If a row should always become an exact independent W and H, leave Fitting Method on Choose and enter those dimensions directly.
Decide What Changes with the Object
The Object / Patterns and Scale Options sections contain three-state checkboxes. Each supports True, False, and Unset:
- True explicitly enables the behavior.
- False explicitly disables it.
- Unset omits the property and leaves the method to its applicable default behavior.
Unset is therefore not the same as False.
Transform Objects and Patterns
Transform Objects writes transformObjects. Enable it when the object's geometry should move or resize. Disable it only when the row is intended to transform applicable pattern artwork without changing the containing object's geometry.
Change Fill Patterns writes changeFillPatterns and controls whether a pattern used by a fill transforms with the object.
Change Stroke Pattern writes changeStrokePattern and controls whether a pattern used by a stroke transforms with the object.
These pattern options concern pattern content, not ordinary solid fill or stroke colors. Setting Transform Objects to False while enabling a pattern option can change the pattern inside stationary artwork.
Measure Visible or Geometric Bounds
Use Preview Bounds writes usePreviewBounds:
- True includes visible stroke widths and effects when the transform measures bounds.
- False uses the underlying geometric bounds.
- Unset omits the property.
This choice can change exact position and size results when thick strokes, shadows, glows, or other effects extend beyond a path. Use preview bounds when the visible edge must meet a production coordinate or dimension; use geometric bounds when the path itself is the reference.
Scale Strokes and Corners
Scale Strokes writes scaleStrokes and controls whether stroke widths and applicable effects scale with the object. Disable it when geometry should resize while stroke weight remains constant.
Scale Corners writes scaleCorners and controls whether applicable corner treatments scale with the object. Disable it when a corner radius or similar corner treatment should retain its existing size.
Combine Transform Operations Deliberately
A single row can position, translate, rotate, shear, flip, and resize the same artwork. That is powerful, but it also means that anchors and bounds can affect the final result together.
A dependable workflow is:
- Select one representative object and use Apply to Selection while building the transform.
- Choose a focused Target Object Tags search for the reusable row.
- Decide between exact Position and relative Translate values.
- Set the XY Anchor for exact positioning and the Anchor Point for rotation, reflection, shear, or scaling.
- Choose one primary size family: absolute dimensions, percentages, or size differences.
- Turn off the input link when width and height should receive different entries.
- Set Keep Proportions and Fitting Method only when proportional or one-direction fitting is intended.
- Decide explicitly whether visible bounds, strokes, corners, and patterns should participate.
- Use Add Row and inspect the generated properties before applying the reusable configuration.
When a combined result is difficult to reason about, split it into two Transform rows. Separate rows make the order explicit and are easier to diagnose in the Table preview.
Skip a Reusable Transform Row
Skip is a three-state checkbox that writes skip:
- True writes
skip:trueand bypasses the Transform method for that data row. - False writes
skip:falseand explicitly allows it to run. - Unset leaves
skipout of the generated row.
See Skip and *.
Validation, Warnings, and Common Problems
- Target tags alone are not a complete Transform row. Add Row and Apply require at least one position, translation, rotation, scale, shear, fitting, bounds, pattern, or other transform option.
- If no action is configured, the editor reports:
Set at least one position, translation, rotation, scale, shear, fitting, or option value before continuing. - Apply to Selection requires at least one selected Illustrator object.
- If an object moves in the expected direction but does not rotate, check whether the value was entered in Translate Angle instead of Rotation.
- If exact X/Y placement appears offset, compare XY Anchor, Use Global Ruler, and Use Preview Bounds.
- If a resized object has the wrong aspect ratio, distinguish the editor's linked inputs from the generated Keep Proportions option.
- If patterns remain stationary or move unexpectedly inside an object, inspect Transform Objects, Change Fill Patterns, and Change Stroke Pattern together.
- If strokes or corners become too heavy or too small after resizing, set Scale Strokes and Scale Corners explicitly.
- Placeholders are examples only; blank fields do not contribute properties to the generated row.
Control-to-Property Summary
| Editor purpose | Darty property |
|---|---|
| Artwork to transform | Target header / tagSearch |
| Exact horizontal and vertical position | x, y |
| Point placed at X/Y | xyAnchorPoint |
| Relative horizontal and vertical movement | deltaX, deltaY |
| Vector movement | distance, angle |
| Turn the object | rotation |
| Slant the object | shear |
| Reflect horizontally, vertically, or both | flip |
| Pivot for rotation, shear, reflection, and scaling | anchorPoint |
| Absolute dimensions | width, height |
| Horizontal and vertical percentage scaling | scaleH, scaleV |
| Added or subtracted dimensions | widthDiff, heightDiff |
| Preserve the current aspect ratio | keepProportions |
| Shrink or enlarge artwork toward a target size | fittingMethod |
| Transform the containing object geometry | transformObjects |
| Transform fill and stroke patterns | changeFillPatterns, changeStrokePattern |
| Use global rather than artboard ruler coordinates | useGlobalRuler |
| Include strokes and effects in measured bounds | usePreviewBounds |
| Scale stroke widths and applicable effects | scaleStrokes |
| Scale applicable corner treatments | scaleCorners |
| Skip Transform for a data row | skip |
The Scale / Size link is editor-only and is not written to the row.
Capture, Apply, and Review
- Tools Method Actions and Apply Modes explains Reset, Add Row, Apply, Apply to Selection, and row editing.
- Tools Method Table Preview explains how to inspect, edit, reorder, copy, download, and apply captured Transform rows.
- Transform method reference provides accepted aliases, illustrated behavior, spreadsheet examples, and sample files.