
Rasterize Tool
Use Tools → Methods → Rasterize to convert tagged Illustrator artwork into raster artwork with a controlled color mode, resolution, background, edge treatment, and result tags.
Rasterizing replaces editable vector paths, type, and live effects with pixels. It can simplify very complex production artwork, but the original structure cannot be recovered from the raster result. Use Add Row to inspect a reusable configuration without changing Illustrator, and keep a duplicate of artwork that may need later vector edits.
The editor is easiest to understand as four decisions:
- Which artwork should become raster artwork?
- What color mode and resolution should the image use?
- How should edges, transparency, spot colors, and an optional clipping mask be handled?
- Should the resulting raster items receive numbered Darty tags?
For accepted values and the underlying spreadsheet properties, see the Rasterize method reference.
Configure the Raster Result
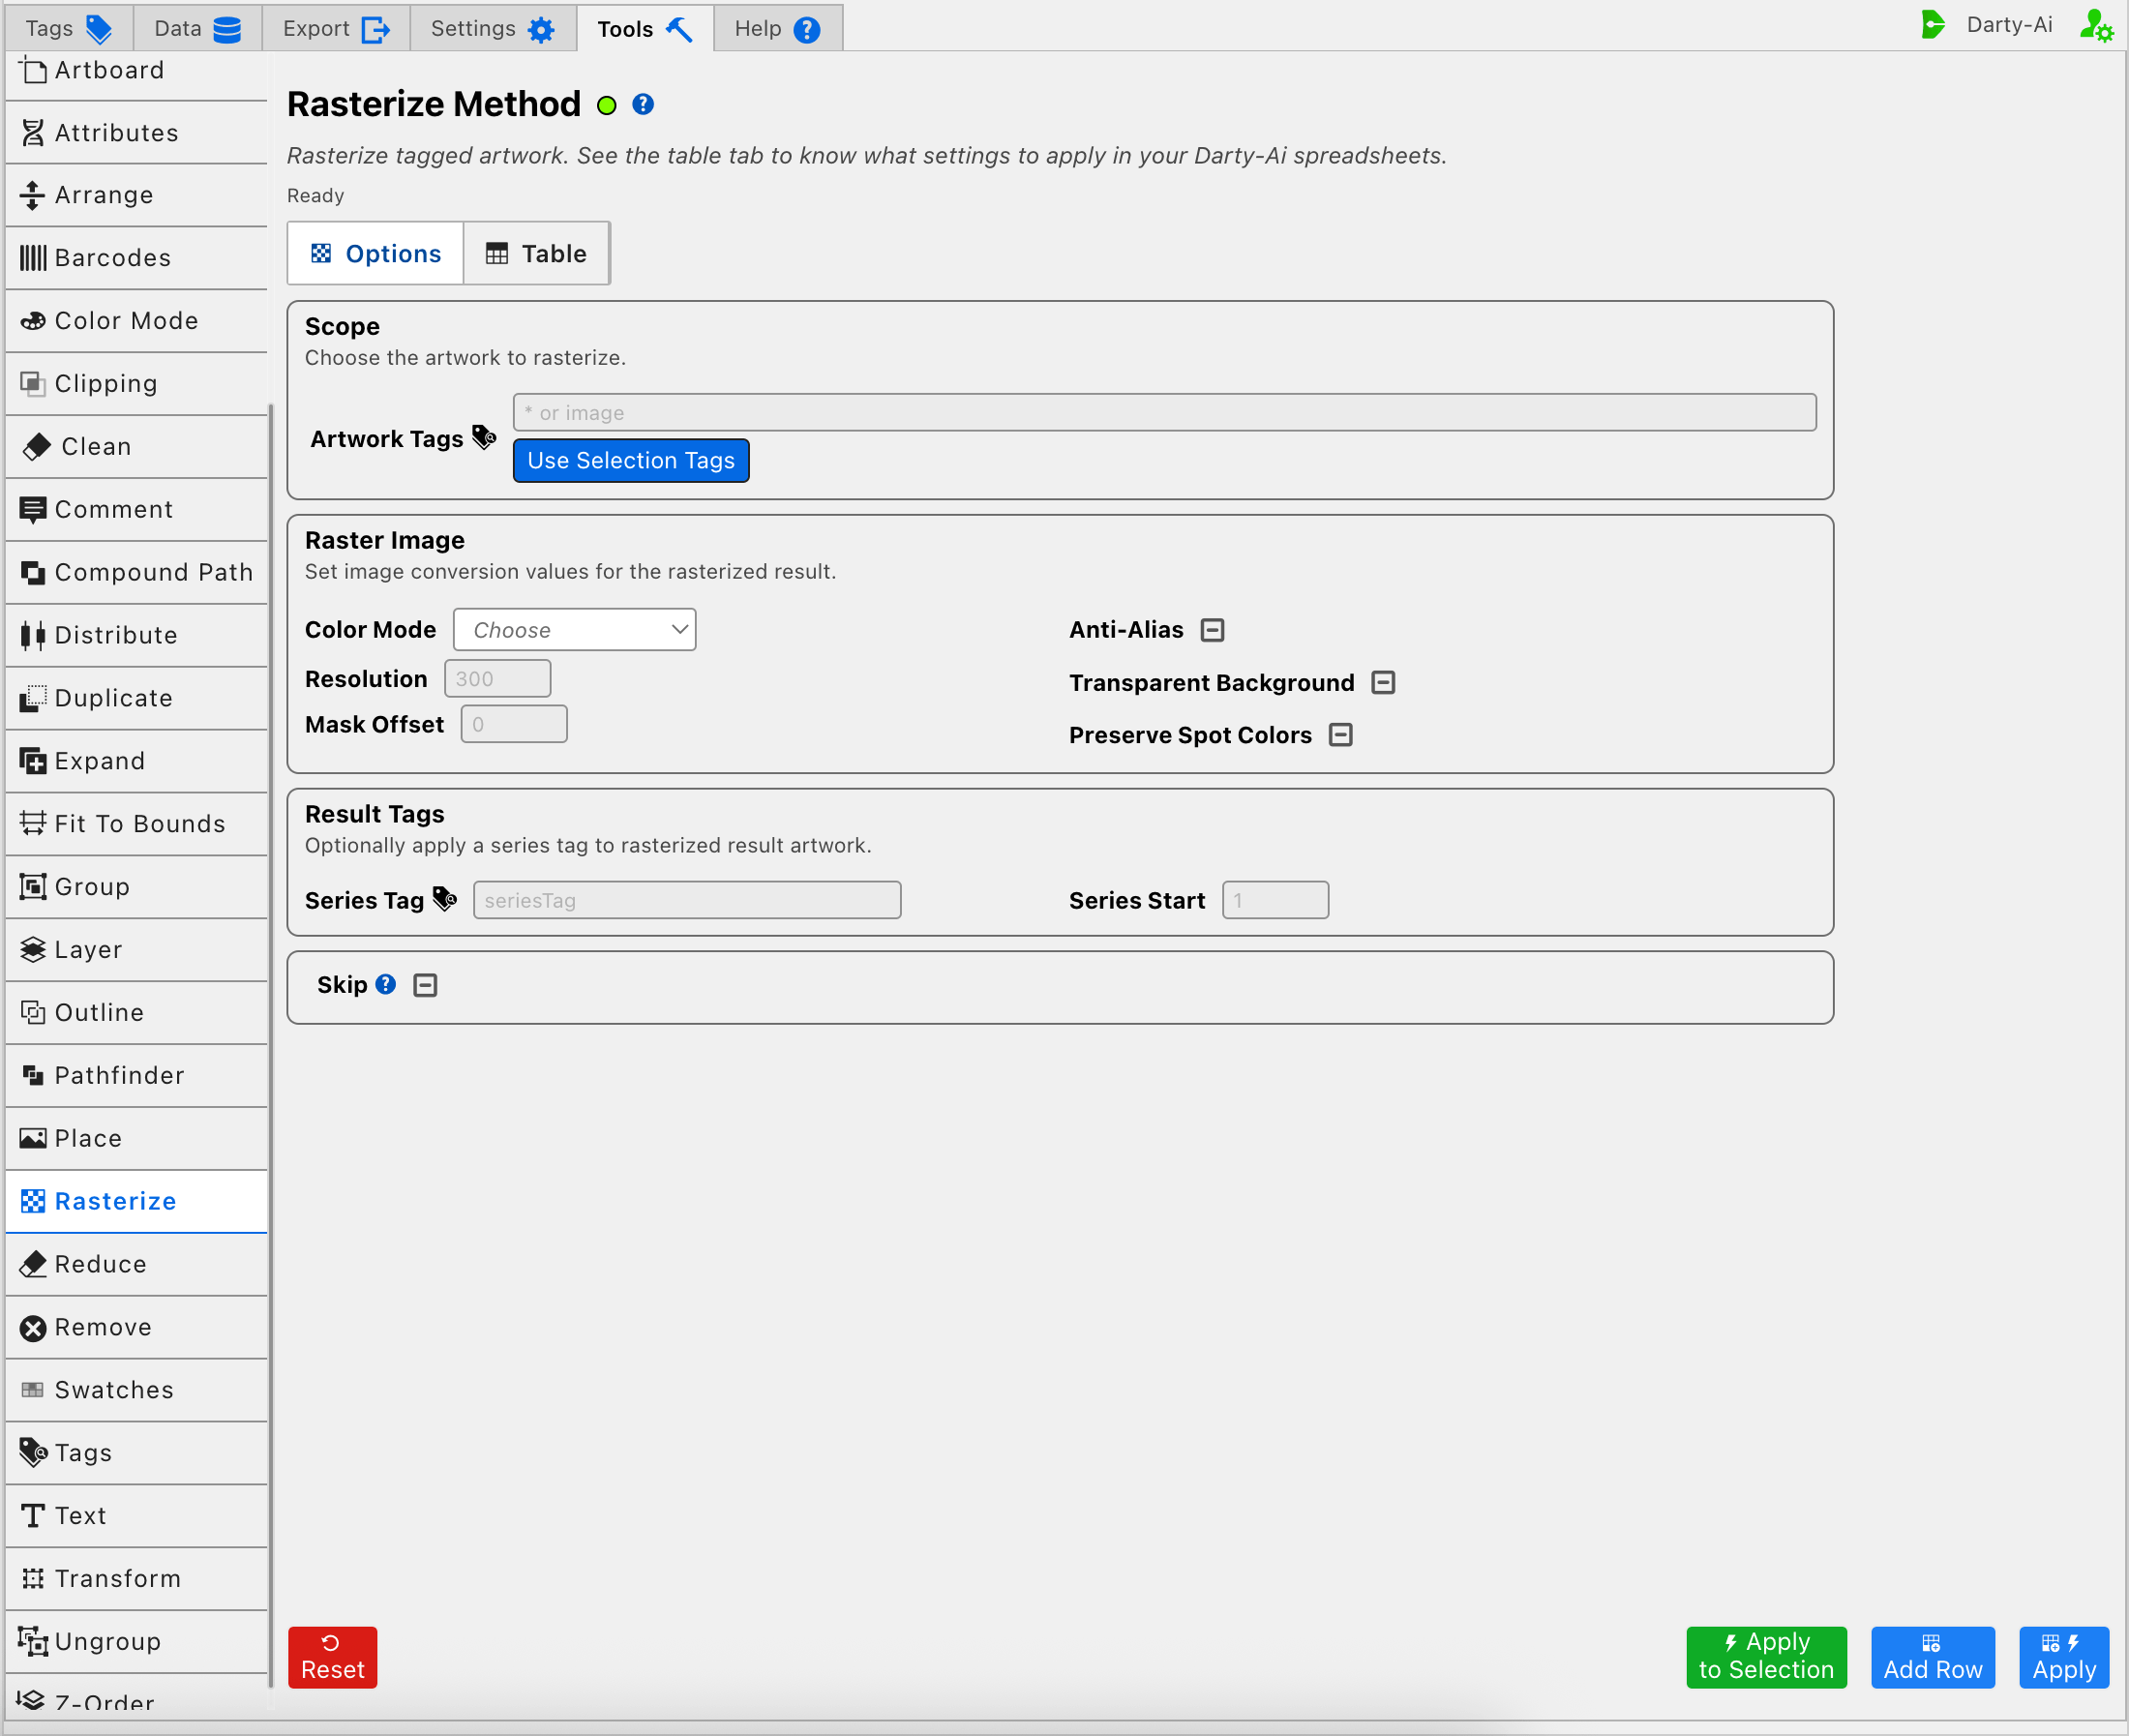
Choose What Becomes Raster Artwork
Artwork Tags becomes the generated row's target search. Enter a narrow Darty tag or expression that identifies only the artwork whose editable structure can be replaced. A search such as photo | texture can find artwork carrying either tag; see Darty Tags for search operators.
Use Selection Tags reads the existing Darty tags from the artwork currently selected in Illustrator and inserts them into Artwork Tags. It helps author the reusable target; it does not rasterize the selection or create new tags.
If Artwork Tags is blank, the Table preview normalizes the target header to *. Rasterize can then affect all eligible artwork, so use that broad target only when the entire eligible document really should be converted.
Apply to Selection is a safer one-time test when the current Illustrator selection should be rasterized regardless of its tags. It temporarily targets that selection, keeps the Artwork Tags field unchanged, and does not add a row to the Rasterize Table.
Choose the Raster Color Mode
Color Mode writes colorSpace and determines how the resulting pixel colors are represented.
| Color Mode | Generated value | Typical use |
|---|---|---|
| RGB | rgb | Screen, web, video, and RGB production documents. |
| CMYK | cmyk | Process-print workflows that require CMYK raster data. |
| Grayscale | grayscale | Single-channel tonal artwork without color. |
| Lab | lab | Workflows that deliberately require Lab color representation. |
Changing color mode can convert colors. Choose the mode required by the destination workflow and inspect important brand, spot, and transparency results after applying. Leaving Color Mode on Choose omits the property and lets the method use its normal color behavior.
Set Pixel Density
Resolution writes resolution in pixels per inch. The method accepts values from 1 through 2400; 300 is a common print-production setting, while screen workflows may use a lower value.
Higher resolution retains more detail but creates more pixels, larger Illustrator documents, and slower processing. Resolution does not make low-detail source artwork more detailed; it controls the sampling density used during conversion.
Leave Resolution blank to omit the property and use the method's normal setting.
Control Edges and Background
Anti-Alias, Transparent Background, and Preserve Spot Colors are three-state checkboxes. Each can make an explicit request or remain Unset so the property is omitted.
Anti-Alias
Anti-Alias writes antiAlias.
- True smooths diagonal and curved edges by blending edge pixels.
- False keeps hard pixel boundaries, which can be useful for intentionally crisp pixel-style output.
- Unset leaves the property out of the generated row.
Anti-aliasing normally produces smoother visual edges, but it can introduce partially transparent or blended edge pixels. Inspect the result when exact flat-color boundaries matter.
Transparent Background
Transparent Background writes transparentBackground.
- True keeps areas outside the artwork transparent.
- False rasterizes onto an opaque background.
- Unset omits the property; the documented method default is a transparent background.
Use transparency when the raster must remain composable over other artwork. Use an opaque background only when flattening onto that background is intentional.
Preserve Spot Colors
Preserve Spot Colors writes preserveSpotColors.
- True asks Illustrator to preserve spot-color information during rasterization where the selected color workflow supports it.
- False allows the raster conversion to use its normal process-color behavior.
- Unset leaves the property out.
Spot-color output can depend on the selected color mode and document setup. Verify separations or the resulting swatches when production depends on spot inks.
Add a Clipping Mask and Offset
Mask Offset writes the numeric clippingMaskOffset property. Supplying a value asks the Rasterize method to add a clipping path around the raster result; the value controls how far that path is offset from the rasterized edge.
- Enter
0when the clipping path should follow the edge with no offset. - Enter another supported numeric value when the clipping path should expand or contract from that edge.
- Leave the field blank when the row should not request this clipping-mask behavior.
Mask Offset affects the clipping boundary, not the raster image's resolution or physical scale. Review the result closely when a nonzero offset could crop edge pixels or expose extra transparent space.
Tag the Rasterized Results
Series Tag writes seriesTag and Series Start writes seriesStart. Together they give the rasterized result items predictable numbered Darty tags.
For example, a Series Tag of image with Series Start 5 produces tags beginning with image5, then image6, and so on for additional results. This is useful when later rows need to place, transform, export, or otherwise address the new raster items individually.
Series Start matters only when Series Tag is provided and must contain a number. Leave both fields blank when the results do not need numbered tags.
Skip a Reusable Rasterize Row
Skip is a three-state checkbox that writes skip:
- True writes
skip:trueand bypasses Rasterize for that data row. - False writes
skip:falseand explicitly allows it to run. - Unset leaves
skipout of the generated row.
Skip is useful when only some records in a reusable sheet should lose their editable vector structure. See Skip and *.
Build and Test a Rasterize Configuration
A practical order is:
- Enter precise Artwork Tags, or select expendable test artwork for Apply to Selection.
- Choose the destination Color Mode when the output must use a specific color space.
- Enter a Resolution appropriate for print, screen, or another delivery target.
- Decide whether edges should be anti-aliased and whether the background should be transparent.
- Set Preserve Spot Colors only when the production workflow needs it, then plan to verify the result.
- Add a Mask Offset only when the raster result needs a clipping path.
- Add Series Tag and Series Start when later methods need predictable targets.
- Use Add Row to inspect the reusable configuration, Apply to capture and run it, or Apply to Selection for a one-time test.
Rasterize can run with its normal defaults even when optional conversion fields are blank, so the most important validation is the target scope. Apply to Selection reports No selection. Select artwork first. when nothing is selected. Numeric fields such as Resolution, Mask Offset, and Series Start must contain numbers; an unsupported resolution or malformed value can stop the dispatch.
After applying, inspect edge quality, transparency, color conversion, clipping, and the Layers panel. If the conversion is unsuitable, use Illustrator's undo history before making unrelated document changes.
Control-to-Property Summary
| Editor purpose | Darty property |
|---|---|
| Artwork that becomes raster artwork | Target header / tagSearch |
| Raster color representation | colorSpace |
| Pixel density | resolution |
| Smooth raster edges | antiAlias |
| Transparent or opaque background | transparentBackground |
| Retain spot-color information | preserveSpotColors |
| Clipping path and its edge offset | clippingMaskOffset |
| Numbered result-tag prefix | seriesTag |
| First result-tag number | seriesStart |
| Skip the method for a data row | skip |
Capture, Apply, and Review
- Tools Method Actions and Apply Modes explains Reset, Add Row, Apply, and Apply to Selection.
- Tools Method Table Preview explains how to inspect, edit, reorder, copy, download, and apply captured Rasterize rows.
- Rasterize method reference documents accepted values and spreadsheet properties.